


Imagine you’re shopping for a throw blanket for your couch.
You log onto Etsy and find a listing that looks promising. It's at the top, has a catchy title, and a description that sells the experience of lounging with the blanket. All good signs.
But the photo? Cluttered. The entire living room is pictured, and you have to try very hard to make out the product in the first place.
Frustrated, you move on to other listings, finally making a purchase from one that has clear photos where the product (and its features) are well highlighted.
Moral of the story: not removing the backgrounds of your photos is costing you money.
Key takeaways
Cluttered product photos cost you sales. Buyers often scroll past listings when they can't immediately identify the product being sold.
Removing the background puts your product front and center, creates a professional studio-quality appearance, and helps build the trust that drives conversions.
Clean-background images are also more versatile and can easily be reused across ads, social media posts, banners, and product bundles.
Automated background removal tools are significantly faster and more affordable than manually editing photos in Photoshop, and they require no design experience.
Crosslist's background remover removes backgrounds in one click and includes unlimited removals on every plan.
5 Benefits of photo background removal
Here are all the reasons you should be using a photo background remover.
Puts your product front and center
Your product photos are the first thing potential buyers see, so your product needs to be clearly visible in them. This means no distractions with other items cluttering the photo.
Don’t make viewers play “guess which one’s the item we’re selling.”
Since taking photos with a perfect white background and no distractions every time is a lot of work, you can just remove the backgrounds from your images.
This highlights your product, bringing attention to it and letting your buyers know exactly what they're purchasing.
Adds a professional touch
Whether you’re just a hobbyist seller or an enterprise-level business, brand perception matters. Your photos need to inspire trust and convey the message that you know what you're doing.
Why? Because, buyers seek out serious sellers who are committed to giving them the best possible pre- and post-purchase experience.
The key to this is clarity and quality: two things that background removal gives you. It adds a “studio photography” look without you having to shell out hundreds for that professional look.
We humans also tend to associate professional-grade photos with premium-quality materials. See how neat and clear this product photo looks? 👇
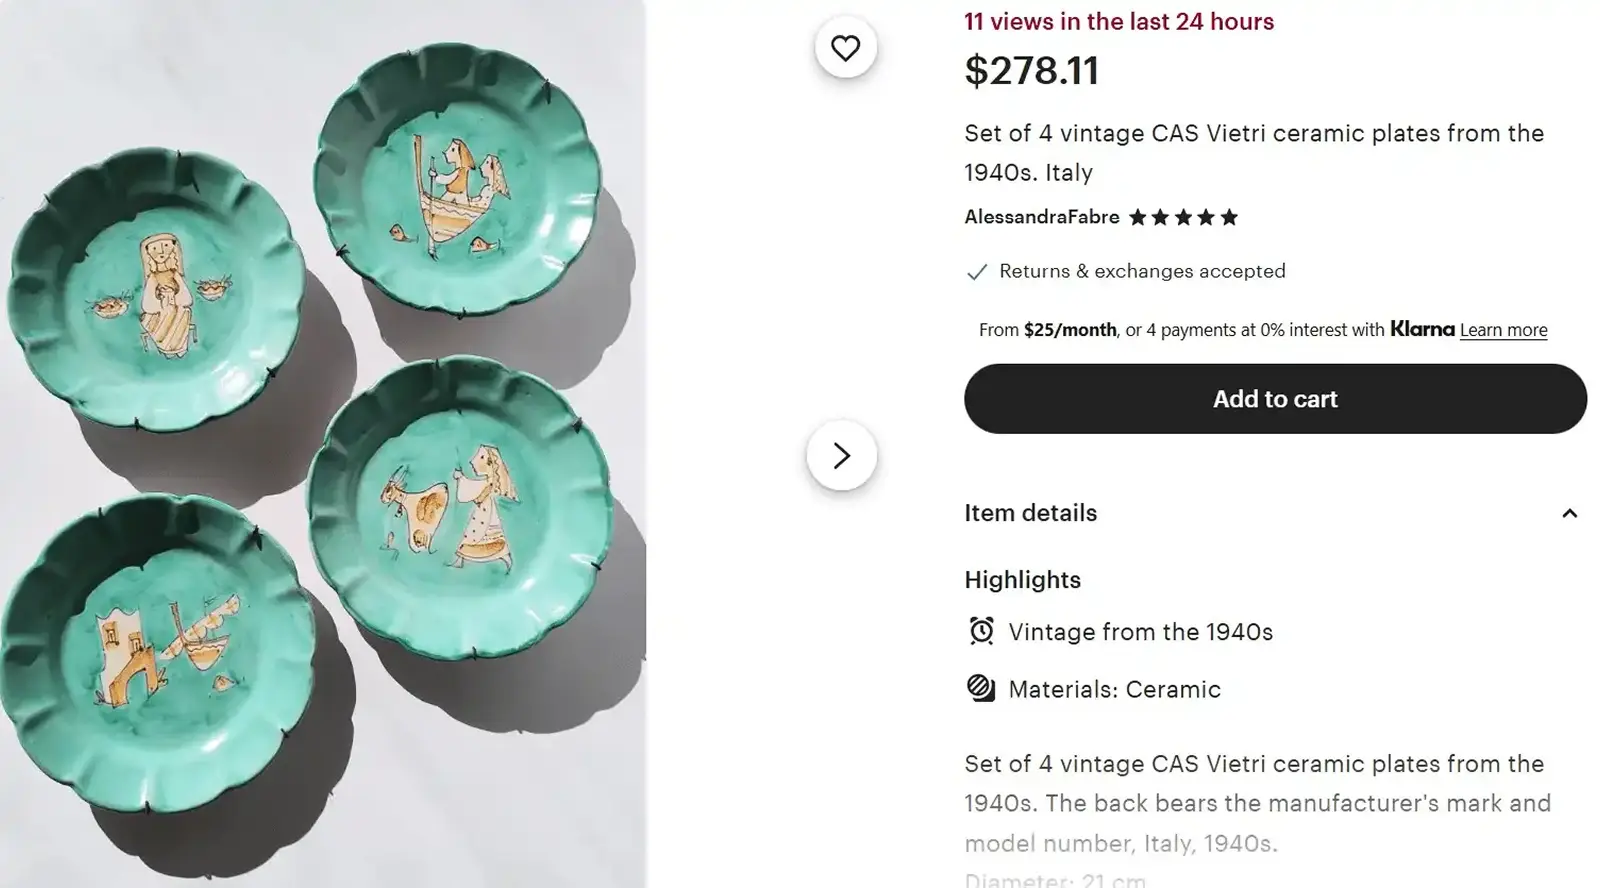
In a nutshell, photo background removal takes you from amateur to professional.
Makes more sales
Or, should we say that it prevents you from losing out on sales?
As we mentioned in the example in the intro section, product photos that scream “amateur hour” build distrust and turn potential customers away — even if the rest of your listing is tweaked to perfection.
But, a simple background removal makes your product instantly more appealing, builds trust, and encourages customer conversions, making for a smoother shopping experience altogether.
Makes repurposing easy
Product photos are rarely a one-and-done thing. If you’re marketing your store (and you should be), you’ll likely use the same photos for a variety of other marketing assets.
Think social media posts, banners, emails, marketplace ads, and whatnot.
This is where having a photo with a clear background makes your job that much easier. Why? Because you can easily adapt your product photos to your marketing materials.
You can easily add background text, apply seasonal themes, and blend your photos seamlessly into your marketing assets — be it collages, hero images, or banners.
And repurposing doesn't stop at marketing assets.
Once you've got a clean, professional photo, Crosslist's AI listing generator can turn it into a complete listing, including a title, description, condition details, and pricing suggestions.
So the same photo that anchors your ad also does the heavy lifting on your product page.
Not only does this help you create more content faster, it also lowers your content creation costs.
Another benefit to removing your photo’s background is that it gives you space to highlight certain important details about your product, such as measurements, sizes, material quality, and so on.
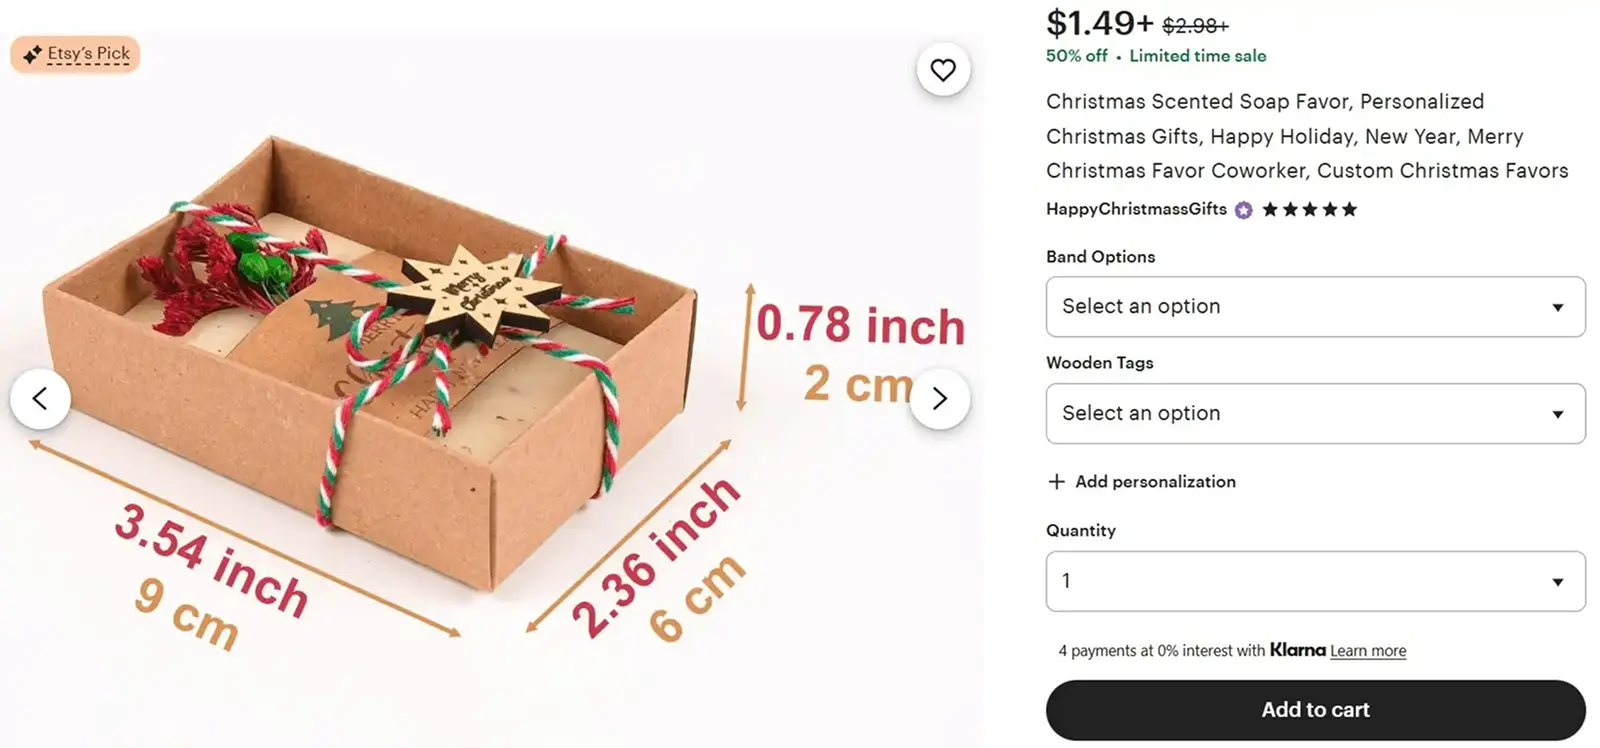
If your products have certain standout features that you want to call attention to immediately, including them in your product photos is a great idea as this can lead to quicker conversions.
Photo background removal also makes it easy for you to club various products together into a single image whenever you’re selling product bundles or subscriptions!
Builds consistency
Brand recognition often begins with brand consistency, which is just fancy speak for having your own signature style. People need to be able to look at your photos and think, “Oh yeah, this is so them.”
How does photo background removal help you achieve this? Well, for starters, it gives you a clean, professional look, which is great as users will associate your brand with premium-looking photos.
However, you can also go a step further and add specific backgrounds to your photos. Like this: 👇

Notice how the background is still clean and doesn’t interfere with the product while giving the photo a signature aesthetic? That’s what we’re going for.
Bottom line: Your product photos do a lot of heavy lifting in your listings. Make their job easier by using a background remover.
Photo background removal: Automation vs. manual
Manually getting rid of the backgrounds on your photos through editing tools like Photoshop can give you excellent, fully-customizable results. But, it’s also a time-consuming process that needs design skills.
Automating the process using background removal tools is quicker and cheaper. Just plug in all of your photos, and the tools will remove all the background within a few seconds. (Crosslist’s background remover does exaclty this, and it's unlimited on every plan!)
If you’re a beginner, a one-person team who wants to save time, or someone without any design skills, automating the process is ideal. If you’re a large enterprise who needs custom solutions, then doing it manually could be better.
A guide to photo background removal with Crosslist
Removing your photo backgrounds with Crosslist is pretty easy; it only takes the click of a button. And no matter which Crosslist plan you’re on, you get unlimited image background removals each month.
Here’s how:
When you create a new listing, you’ll be asked to upload your product images. These can be anywhere between 9 and 24, depending on the plan you’re on.
Once the images are uploaded, you’ll see a button with a scissor icon called “Remove all backgrounds.”
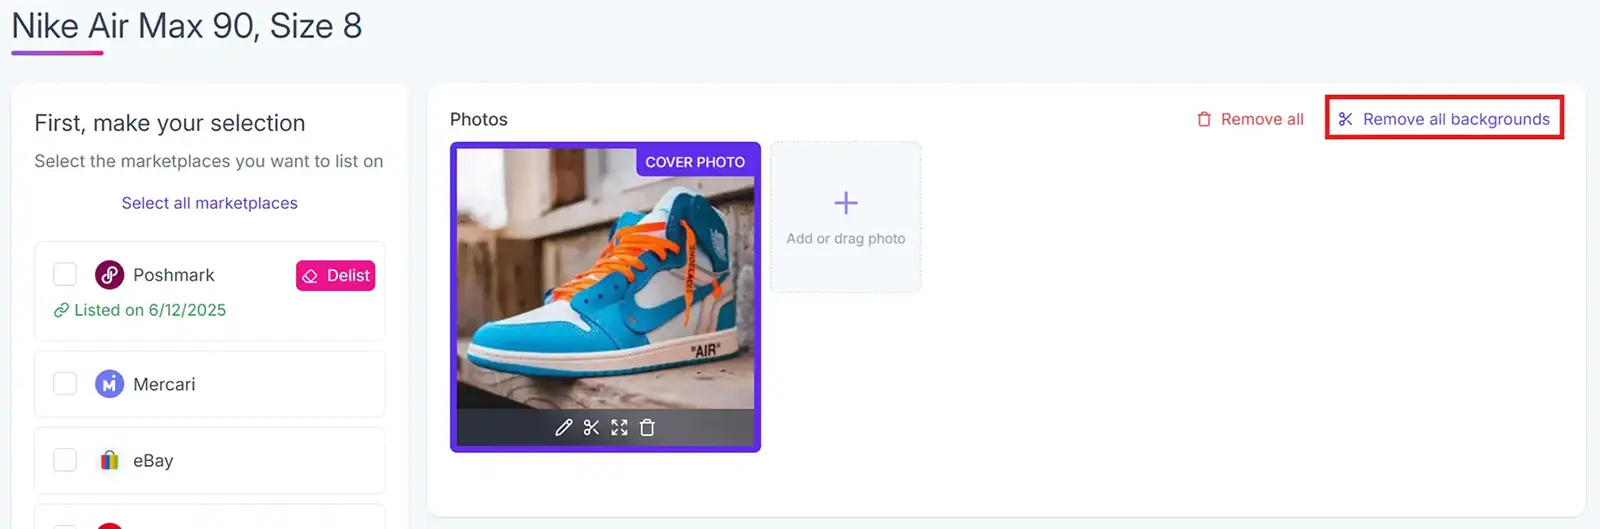
Click on that, and voila! Crosslist will remove the background from all of your images and replace it with a clean, white backdrop.
Our tool automatically identifies the subject, so you don’t have to lift a finger (beyond clicking that button).
If you want to remove the background from a single photo, click on the scissor icon available at the bottom left corner of each image.
Photo background removal dos and don’ts for e-commerce sellers
Here are some tips to follow (and mistakes to avoid) when removing the backgrounds from your photos.
Tips to follow
Start with high-quality images: Make sure you take your product photos in good lighting. Crisp, clear images make it easy for background removal tools to tell your main subject and background apart. Never use low-quality images. Ever.
Avoid overly cluttered backdrops: Make the job of the tool easier by starting with as clean a background as possible. For instance, if you’re photographing a garden tool in your garden, focus on the item. Your whole garden doesn’t need to be in the picture.
Use formats that support transparency: Typically, PNG, SVG, and GIF formats support transparent pictures for online use, so saving your images in these formats will make your job easier.
Use automated background removers: Not only is manual editing time-consuming, it also needs a lot of design know-how. Removing backgrounds manually also means you run the risk of not removing finer details properly. But, with automated background removers, these concerns are non-existent. They also edit multiple photos at once, which means you’ll free up a lot of time.
Add embellishments: Once the background's gone, you can add shadows, insert product details, or restyle the shot to fit your brand aesthetic. Crosslist's AI photo editor lets you do this with simple text prompts.
Test the images: Before you go ahead and send your product photos out into the wild, test how the images appear in various backgrounds (and on different devices). For instance, if you’re going to use them in an ad, make sure it looks great and blends in well with the marketing assets.
Mistakes to avoid
Over-editing your images: This can make your products look unnatural (which is something we’re trying to avoid), so keep it simple.
Inconsistent shadows: If you’re adding shadows, make sure it goes well with the lighting and contrast of your photos. The key is maintaining realism without making it look like it’s been edited on.
Leave rough edges: This won’t be a problem when using automated background remover tools, but just do a double-check for any rough edges that may need to be smoothened out.
Applying pure white backgrounds to dimly lit images: This turns the background into the shining star, while your product fades into the background. Choose a background color that complements the contrast of your photo.
Clean photos, everywhere you sell
Your product photos do a lot of heavy lifting, so don't let them stop at one marketplace.
Because Crosslist is a cross listing tool, the same polished, background-free photos post straight to every marketplace you sell on. You don’t need to re-upload or re-edit per platform before posting.
Remember, background removal increases conversions, so arm yourself with this weapon.
Try Crosslist risk-free with the 3-day money-back guarantee.
Imagine you’re shopping for a throw blanket for your couch.
You log onto Etsy and find a listing that looks promising. It's at the top, has a catchy title, and a description that sells the experience of lounging with the blanket. All good signs.
But the photo? Cluttered. The entire living room is pictured, and you have to try very hard to make out the product in the first place.
Frustrated, you move on to other listings, finally making a purchase from one that has clear photos where the product (and its features) are well highlighted.
Moral of the story: not removing the backgrounds of your photos is costing you money.
Key takeaways
Cluttered product photos cost you sales. Buyers often scroll past listings when they can't immediately identify the product being sold.
Removing the background puts your product front and center, creates a professional studio-quality appearance, and helps build the trust that drives conversions.
Clean-background images are also more versatile and can easily be reused across ads, social media posts, banners, and product bundles.
Automated background removal tools are significantly faster and more affordable than manually editing photos in Photoshop, and they require no design experience.
Crosslist's background remover removes backgrounds in one click and includes unlimited removals on every plan.
5 Benefits of photo background removal
Here are all the reasons you should be using a photo background remover.
Puts your product front and center
Your product photos are the first thing potential buyers see, so your product needs to be clearly visible in them. This means no distractions with other items cluttering the photo.
Don’t make viewers play “guess which one’s the item we’re selling.”
Since taking photos with a perfect white background and no distractions every time is a lot of work, you can just remove the backgrounds from your images.
This highlights your product, bringing attention to it and letting your buyers know exactly what they're purchasing.
Adds a professional touch
Whether you’re just a hobbyist seller or an enterprise-level business, brand perception matters. Your photos need to inspire trust and convey the message that you know what you're doing.
Why? Because, buyers seek out serious sellers who are committed to giving them the best possible pre- and post-purchase experience.
The key to this is clarity and quality: two things that background removal gives you. It adds a “studio photography” look without you having to shell out hundreds for that professional look.
We humans also tend to associate professional-grade photos with premium-quality materials. See how neat and clear this product photo looks? 👇
In a nutshell, photo background removal takes you from amateur to professional.
Makes more sales
Or, should we say that it prevents you from losing out on sales?
As we mentioned in the example in the intro section, product photos that scream “amateur hour” build distrust and turn potential customers away — even if the rest of your listing is tweaked to perfection.
But, a simple background removal makes your product instantly more appealing, builds trust, and encourages customer conversions, making for a smoother shopping experience altogether.
Makes repurposing easy
Product photos are rarely a one-and-done thing. If you’re marketing your store (and you should be), you’ll likely use the same photos for a variety of other marketing assets.
Think social media posts, banners, emails, marketplace ads, and whatnot.
This is where having a photo with a clear background makes your job that much easier. Why? Because you can easily adapt your product photos to your marketing materials.
You can easily add background text, apply seasonal themes, and blend your photos seamlessly into your marketing assets — be it collages, hero images, or banners.
And repurposing doesn't stop at marketing assets.
Once you've got a clean, professional photo, Crosslist's AI listing generator can turn it into a complete listing, including a title, description, condition details, and pricing suggestions.
So the same photo that anchors your ad also does the heavy lifting on your product page.
Not only does this help you create more content faster, it also lowers your content creation costs.
Another benefit to removing your photo’s background is that it gives you space to highlight certain important details about your product, such as measurements, sizes, material quality, and so on.
If your products have certain standout features that you want to call attention to immediately, including them in your product photos is a great idea as this can lead to quicker conversions.
Photo background removal also makes it easy for you to club various products together into a single image whenever you’re selling product bundles or subscriptions!
Builds consistency
Brand recognition often begins with brand consistency, which is just fancy speak for having your own signature style. People need to be able to look at your photos and think, “Oh yeah, this is so them.”
How does photo background removal help you achieve this? Well, for starters, it gives you a clean, professional look, which is great as users will associate your brand with premium-looking photos.
However, you can also go a step further and add specific backgrounds to your photos. Like this: 👇
Notice how the background is still clean and doesn’t interfere with the product while giving the photo a signature aesthetic? That’s what we’re going for.
Bottom line: Your product photos do a lot of heavy lifting in your listings. Make their job easier by using a background remover.
Photo background removal: Automation vs. manual
Manually getting rid of the backgrounds on your photos through editing tools like Photoshop can give you excellent, fully-customizable results. But, it’s also a time-consuming process that needs design skills.
Automating the process using background removal tools is quicker and cheaper. Just plug in all of your photos, and the tools will remove all the background within a few seconds. (Crosslist’s background remover does exaclty this, and it's unlimited on every plan!)
If you’re a beginner, a one-person team who wants to save time, or someone without any design skills, automating the process is ideal. If you’re a large enterprise who needs custom solutions, then doing it manually could be better.
A guide to photo background removal with Crosslist
Removing your photo backgrounds with Crosslist is pretty easy; it only takes the click of a button. And no matter which Crosslist plan you’re on, you get unlimited image background removals each month.
Here’s how:
When you create a new listing, you’ll be asked to upload your product images. These can be anywhere between 9 and 24, depending on the plan you’re on.
Once the images are uploaded, you’ll see a button with a scissor icon called “Remove all backgrounds.”
Click on that, and voila! Crosslist will remove the background from all of your images and replace it with a clean, white backdrop.
Our tool automatically identifies the subject, so you don’t have to lift a finger (beyond clicking that button).
If you want to remove the background from a single photo, click on the scissor icon available at the bottom left corner of each image.
Photo background removal dos and don’ts for e-commerce sellers
Here are some tips to follow (and mistakes to avoid) when removing the backgrounds from your photos.
Tips to follow
Start with high-quality images: Make sure you take your product photos in good lighting. Crisp, clear images make it easy for background removal tools to tell your main subject and background apart. Never use low-quality images. Ever.
Avoid overly cluttered backdrops: Make the job of the tool easier by starting with as clean a background as possible. For instance, if you’re photographing a garden tool in your garden, focus on the item. Your whole garden doesn’t need to be in the picture.
Use formats that support transparency: Typically, PNG, SVG, and GIF formats support transparent pictures for online use, so saving your images in these formats will make your job easier.
Use automated background removers: Not only is manual editing time-consuming, it also needs a lot of design know-how. Removing backgrounds manually also means you run the risk of not removing finer details properly. But, with automated background removers, these concerns are non-existent. They also edit multiple photos at once, which means you’ll free up a lot of time.
Add embellishments: Once the background's gone, you can add shadows, insert product details, or restyle the shot to fit your brand aesthetic. Crosslist's AI photo editor lets you do this with simple text prompts.
Test the images: Before you go ahead and send your product photos out into the wild, test how the images appear in various backgrounds (and on different devices). For instance, if you’re going to use them in an ad, make sure it looks great and blends in well with the marketing assets.
Mistakes to avoid
Over-editing your images: This can make your products look unnatural (which is something we’re trying to avoid), so keep it simple.
Inconsistent shadows: If you’re adding shadows, make sure it goes well with the lighting and contrast of your photos. The key is maintaining realism without making it look like it’s been edited on.
Leave rough edges: This won’t be a problem when using automated background remover tools, but just do a double-check for any rough edges that may need to be smoothened out.
Applying pure white backgrounds to dimly lit images: This turns the background into the shining star, while your product fades into the background. Choose a background color that complements the contrast of your photo.
Clean photos, everywhere you sell
Your product photos do a lot of heavy lifting, so don't let them stop at one marketplace.
Because Crosslist is a cross listing tool, the same polished, background-free photos post straight to every marketplace you sell on. You don’t need to re-upload or re-edit per platform before posting.
Remember, background removal increases conversions, so arm yourself with this weapon.
Try Crosslist risk-free with the 3-day money-back guarantee.