How To Cross List From eBay To Poshmark And Vice Versa

So, you’re a seller who only sells either on eBay or Poshmark, and now you’re looking to expand into the other platform, too. But then, you run into a major problem: how on Earth do you possibly transfer all of your listings from one marketplace to the other? It’s going to take ages!
Well, you’re not wrong there. If your plan of action is to have your eBay (or Poshmark) listings open on one tab and manually copy-paste all the details to create new listings on the other platform, then yes. You’re going to be at it for a long, long time.
But, what if we told you that there was a way for you to complete this within minutes? That’s right. You can cross list from eBay to Poshmark (and vice versa) in just a few minutes with the help of Crosslist. Let’s look at how.
First things first: Get Crosslist
The first step to using a tool is to get the tool, of course. So, you’ll need to sign up for a Crosslist subscription if you don’t already have one.
We have several pricing plans ranging from as little as $29.99/ month. There’s also a 3-day money-back guarantee. The best part? Once you finish transferring your inventory, you’ll be able to use Crosslist to create new listings and post them on both eBay and Poshmark simultaneously!
Once you secure your subscription, here are the steps you need to take to cross list your inventory from eBay to Poshmark (and vice versa):
- Import your existing inventory from eBay (or Poshmark)
- Enhance the listings with any missing details or edits (if needed)
- Post the listings to Poshmark (or eBay)
Let’s look at each step in detail.
Importing your existing inventory from eBay or Poshmark to Crosslist
First, you need to bring your existing inventory into Crosslist. You can do this in one of two ways: import your listings in bulk, or import them one-by-one. Unless you only want to import and cross post one or two listings, we recommend going for the bulk import option to save time.
To start importing, log in to Crosslist and navigate to the dashboard. Click on the Import button you see at the top left corner of the screen.

Now, you’ll see a screen with all the 11 marketplaces that Crosslist supports. Select the platform you want to import from. In this case, that would be Poshmark (or eBay).

Once you complete this step, Crosslist will automatically start syncing all of your existing listings from that marketplace. You’ll see a yellow sync text at the top right of your screen which is what indicates that the syncing process is taking place.
Give the tool a few minutes to finish syncing up — especially if you have a large inventory. Once that’s done, you can choose which listings you want to import.
You can either:
- Import your entire inventory at once (regardless of whether you have 50 listings or 500), or
- Import your eBay or Poshmark listings in batches (with the maximum number of listings being 100 per batch)
Choose the first option if you’re planning to sell all of the items from your existing listings and don’t have anything out of stock. If you only want to cross post a portion of your existing listings, though, you can select the second option.
If you’re importing your listings in batches, you’ll obviously want to make sure that you’re not accidentally bringing in the same listings twice to Crosslist. There’s an easy way to do this. Simply toggle the “Only show listings not yet imported” button that you see near the top of the screen (right beside the search bar). Easy peasy!
Importing only specific listings? Use Crosslost’s advanced search function to search for and select them!
Once you’ve chosen the listings you want to import from eBay (or Poshmark) to Crosslist, click on the Import listings button at the top right corner of the screen.
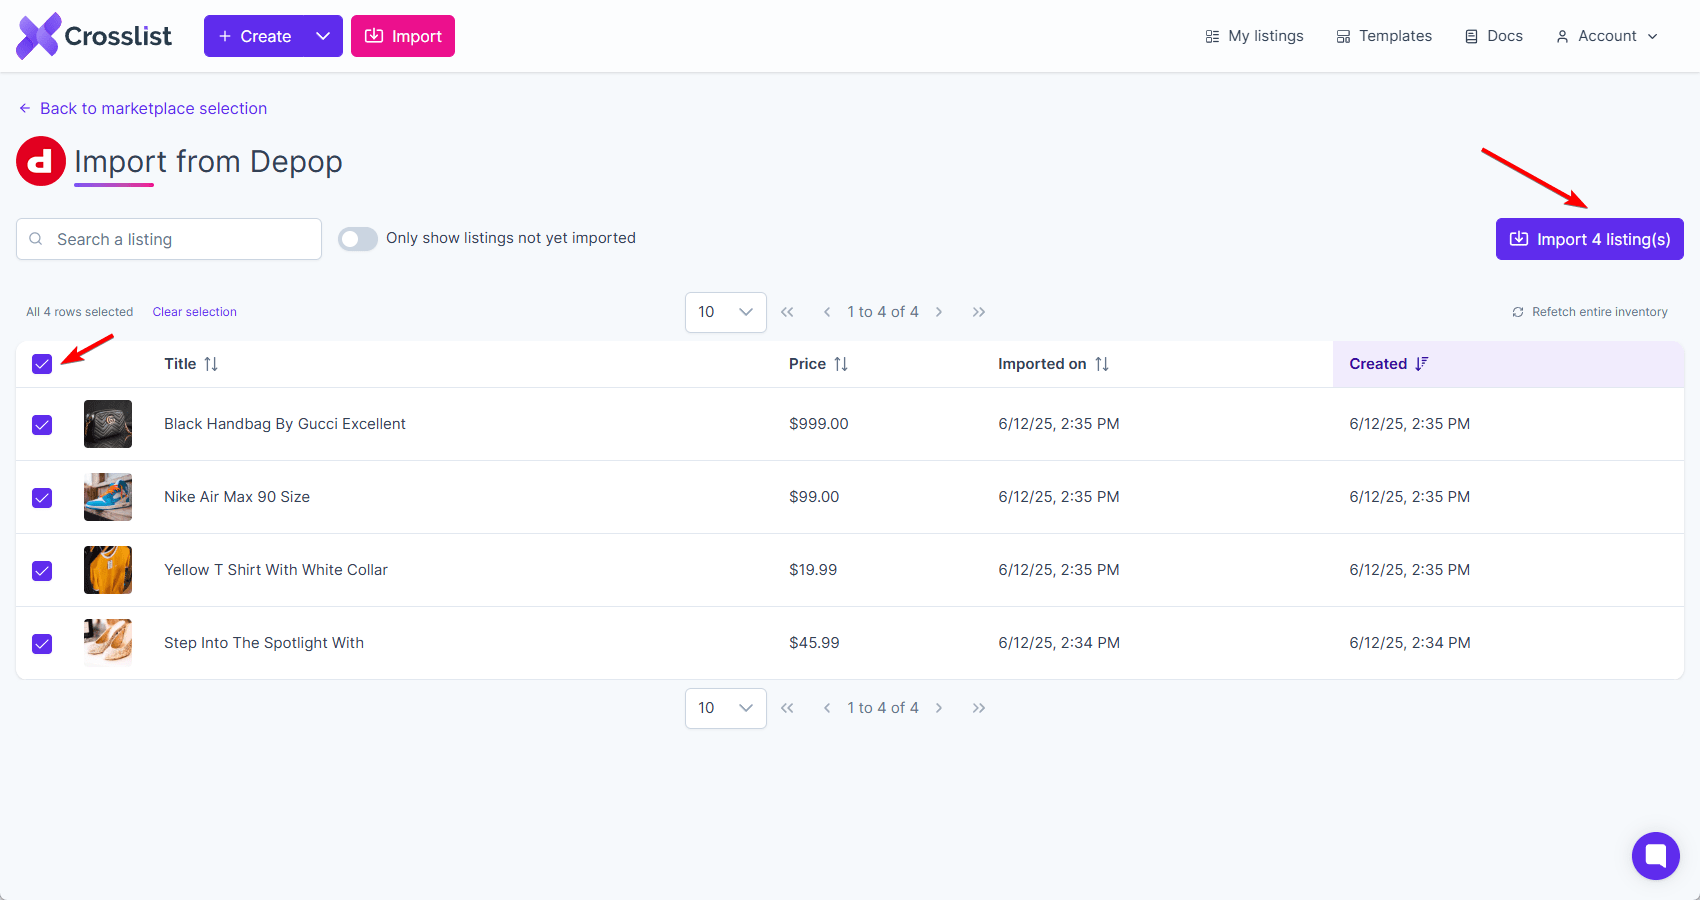
Voila! Now your inventory is imported and ready to be cross posted!
Enhancing and optimizing your imported listings
In some cases, before you can cross post your listings to Poshmark or eBay, you may have to enter some additional platform-specific information or edit a few things.
This is because not all platforms share the same field attributes. For instance, one marketplace might ask you info about your stock quantities, while another might want you to resize your images, instead.
If you know what details to add, you can click on the listings and make the edits.
Poshmark-specific information:
When cross posting from eBay to Poshmark, you’ll have to fill out the following information:
- Original price, i.e. the retail price of the product: If you don’t want to disclose this to buyers, simply enter a zero as you can’t leave this field blank.
- Product availability: Crosslist will automatically set this to “For Sale.” If your item is reserved for a buyer, set it to “Not for sale.” If a certain product will become available soon, select “Drops” along with the date from which buyers can purchase it.
- Tags: Although this is optional, you can add whether your products come with original tags attached.
eBay-specific information:
eBay asks for the most comprehensive details, so you’ll have to fill in the following depending on the item you’re selling:
- Auction price, which is the starting price for items that you want to auction, and reserve price, which is the lowest price you would be willing to accept for an auctioned item
- Fixed price if you don’t want to auction your items
- Special attributes
- Age level (where applicable)
- Genre (where applicable)
- Type
- Style
- Lining material (where applicable)
- Easy pricing, which lowers your price over time if your product is sitting stale
Alternatively, you can skip that step and go directly to choosing the marketplaces you want to post your listings on. In case any missing details need to be added, Crosslist will automatically prompt you to do so. You’ll get a message like this: 👇
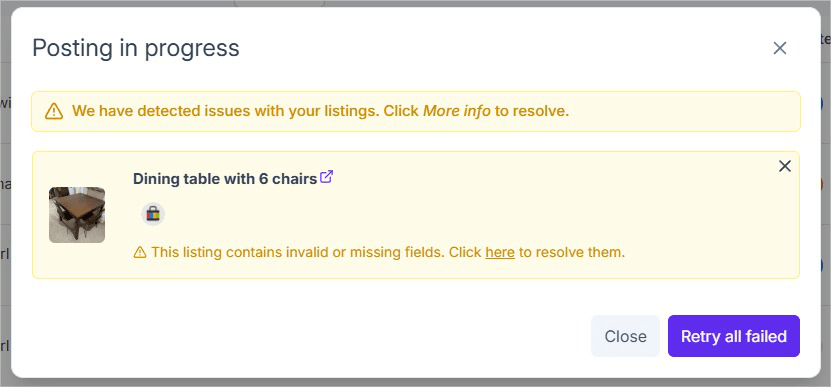
Even if you don’t fill out any missing details in this step, you could always just optimize your listings for SEO before you cross post them. This includes:
- Taking newer, higher-quality pictures — especially if your existing listings are very old. While using your phone camera works, platforms like MPB offer used camera equipment for better quality photos. Once the pictures are taken, you can edit them within Crosslist for a polished finish that attracts more buyers.
- Rewriting product descriptions
- Adding short-form videos to your listings.
- Making sure you’re using the right tags and categories.
These will make your listings more searchable, giving your products a boost!
Posting your listings
The final step is to post your listings to eBay (or Poshmark). Once again, you can do this one-by-one or in bulk.
To cross post a specific listing, go to the listings overview and select the one you want to post. Select the marketplace(s) you want to post it to. In this case, that would be eBay (or Poshmark). Then, hit the Post button.

To post your entire inventory in bulk, select all the listings from the dashboard. Next, click on the Bulk post (x) listings button that you see on the top right corner of your screen.
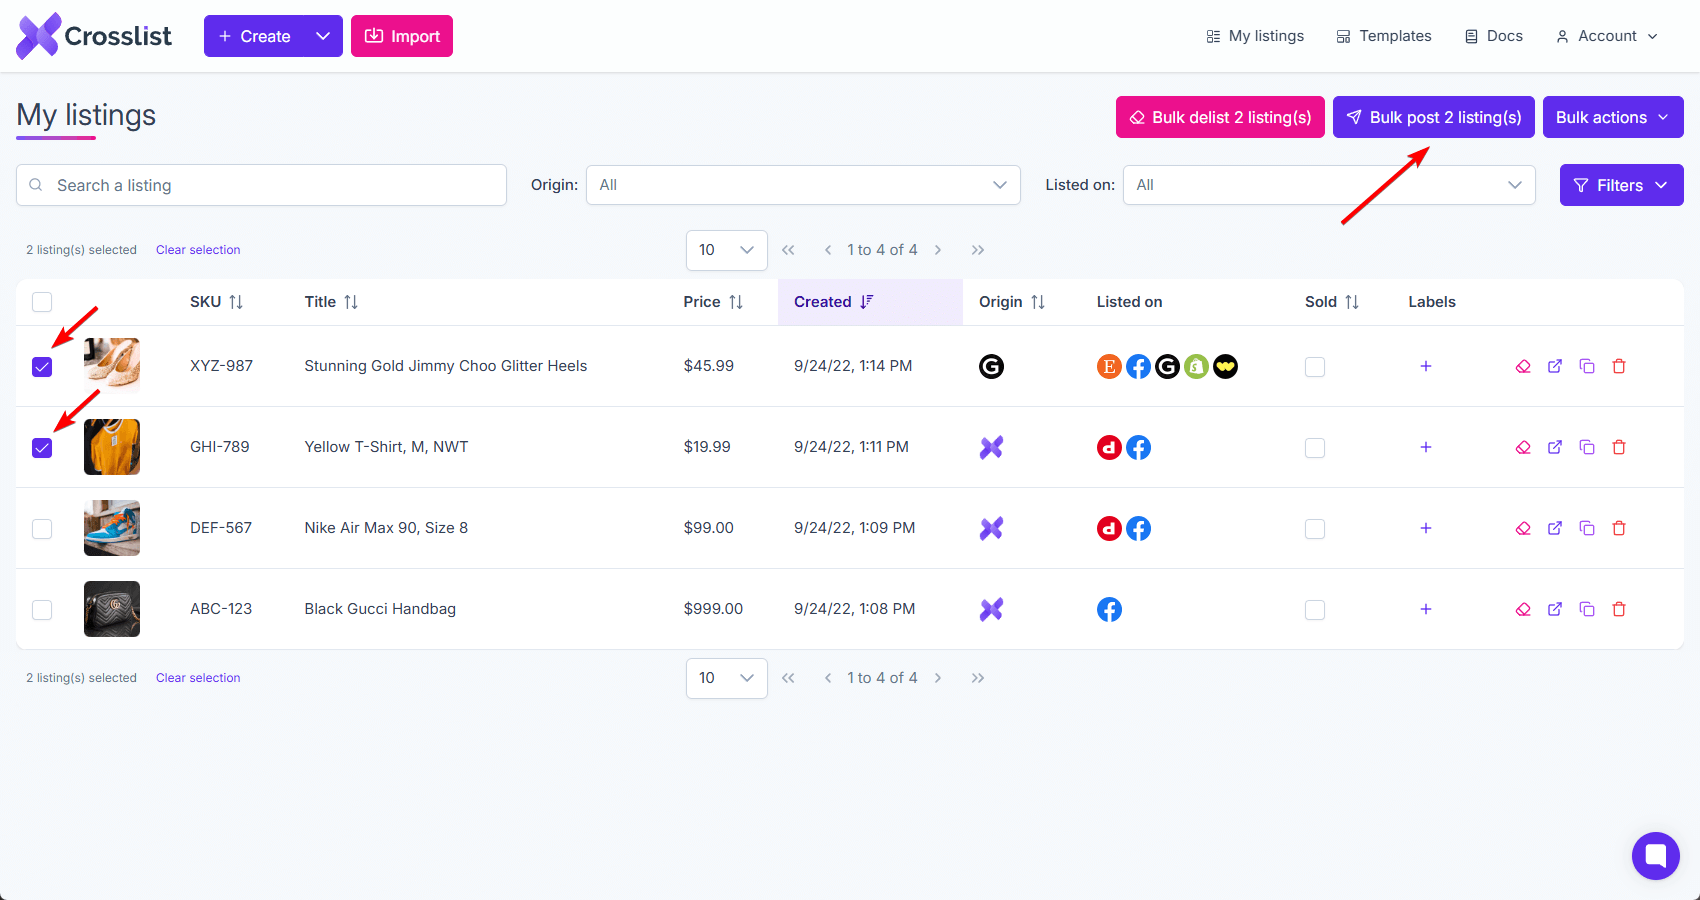
A pop-up will appear, asking you to select the marketplaces you want to cross post to.
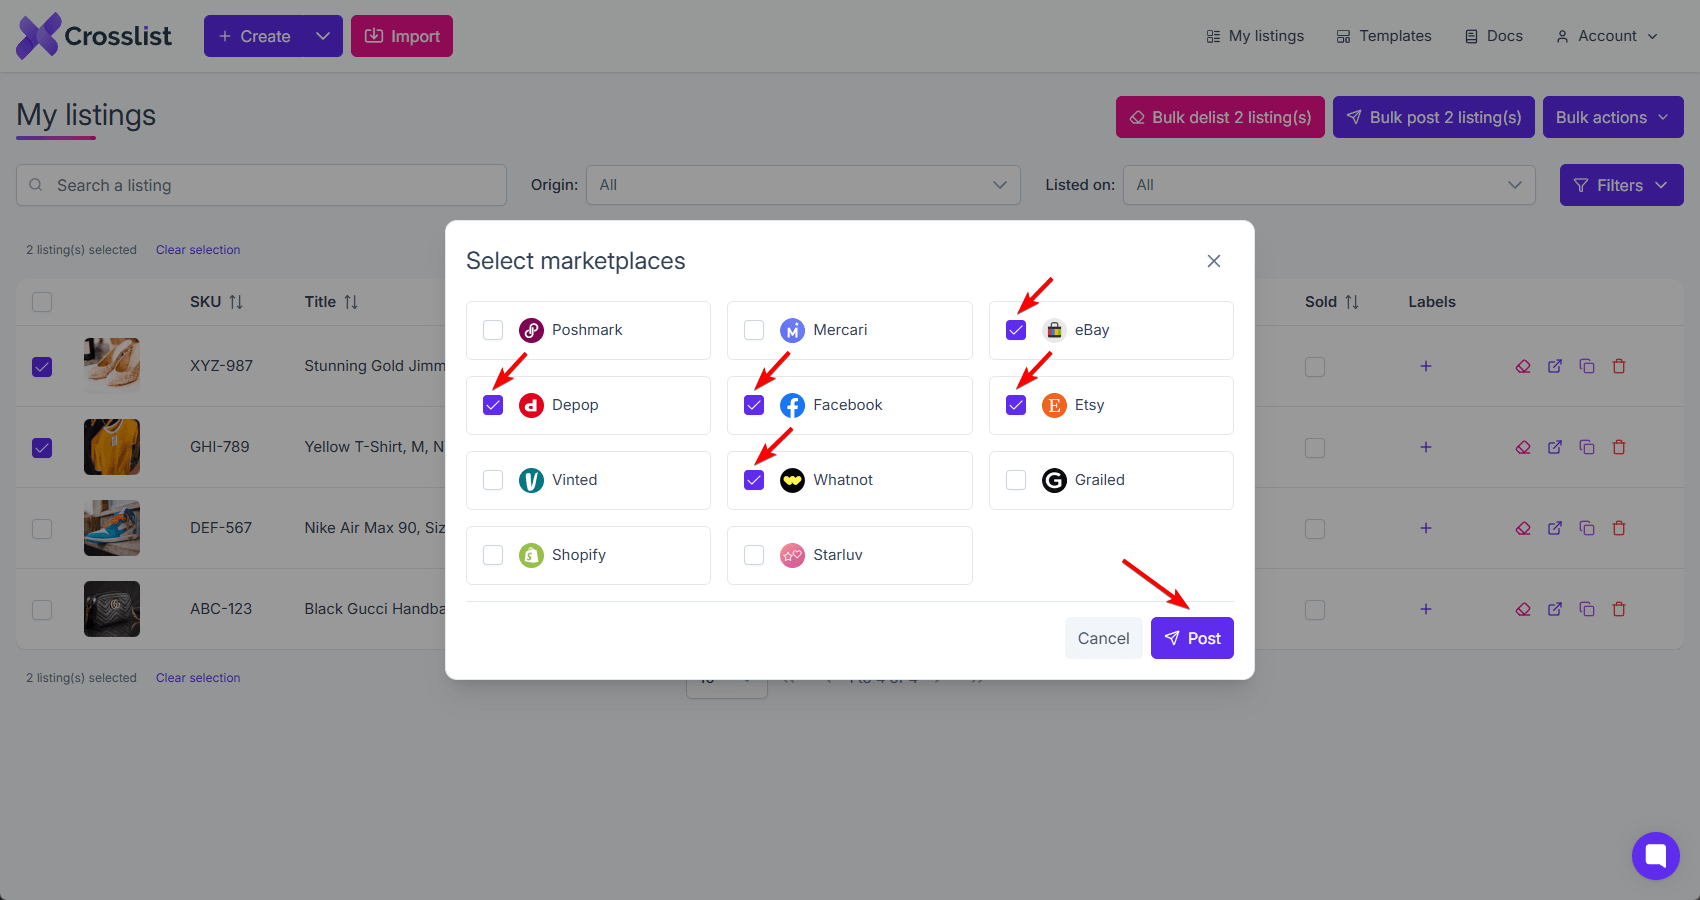
Once you make the choice, click the Post button. That’s it! Crosslist will automatically post your listings to the relevant marketplace(s).
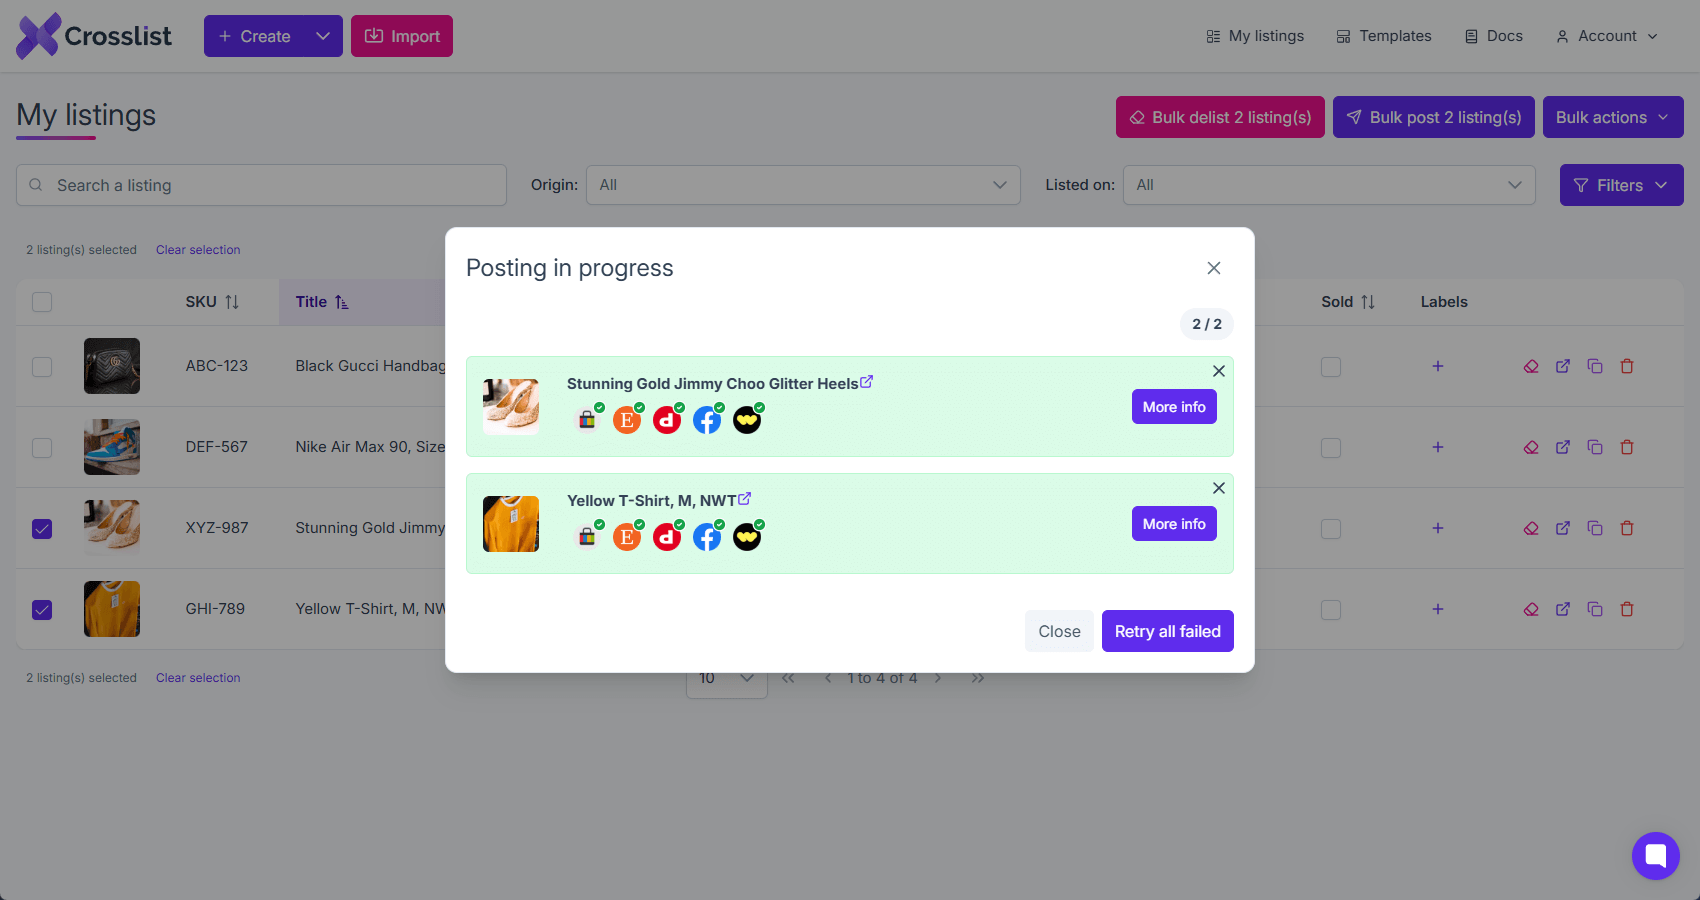
You don’t have to do anything else! Crosslist will open a tab for each marketplace you’re cross posting to and auto post your listings in the background. This means you don’t need to manually check your listings. They’ll go live automatically!
Crosslist gradually distributes all of your listings by using a queuing system to help protect your online marketplace accounts from rate limits. It also opens only one tab per marketplace, so your device won’t slow down. This means you can continue using your computer while Crosslist does its job in the background.
What else can you do with Crosslist?
In addition to cross listing your inventory from one marketplace to another, you can use Crosslist to:
- Create new listings and simultaneously post them to the 11 supported marketplaces
- Delist and relist your stale listings
- Create AI-generated listings
- Set up default shipping profiles for each marketplace
- Get competitive pricing suggestions based on market trends
- Make more sales on Poshmark using the free Poshmark bot
- Enhance your product images with the state-of-the-art image editor
- View your entire inventory from a single dashboard
👉 Here’s a comprehensive review of Crosslist’s features for you to check out!
You don’t have to take our word for it, either. We have a 4.6 star rating on Trustpilot, so you know we not only talk the talk, but walk the walk as well.
Questions or just say hello!
Well, congratulations to you for making it this far! Here’s a reward in the form of a 10% discount code on your first month of Crosslist (add during check-out). Sign up now with a 3-day money-back guarantee!
10% off
BLOG10
You can learn more about how Crosslist works here.
If you have further questions, feedback, bug reports, or want to know a bit more about us, why not swing by for a chat and say G’day! You can have a chat with us through Messenger.
