How To Cross List From Poshmark To Mercari And Vice Versa

If you’re reading this, it means you’re a seller on either Poshmark or Mercari and are looking to make the jump to selling on the other platform, too. Or, maybe you’ve already expanded, only to realize just how mind-numbingly boring and time-consuming it is to manually transfer your inventory from one platform to another.
We get you. Shifting your existing inventory across online marketplaces is an essential, yet tedious, part of multi-channel expansion. And this is not something you’re going to want to do by copy-pasting each listing one by one… unless you like repetitive tasks that take up hours of your time. 👀
The better alternative is to use a multi-channel cross posting app like Crosslist which will help you get the job done within minutes. Let’s look at how to crosslist from Poshmark to Mercari (and vice versa) in a jiffy!
First things first: Get Crosslist
The first step is to sign up to Crosslist (if you haven’t already). Our cross listing tool offers several pricing plans starting from just $29.99/ month. There’s also a 3-day money-back guarantee.
The bonus part is that you can use Crosslist later on to post any new listings to Mercari and Poshmark simultaneously.
Once you sign up, you can start cross listing from Poshmark to Mercari (and vice versa). This process involves three steps:
- Importing your existing inventory from Poshmark or Mercari to Crosslist
- Enhancing your listings with any additional information or edits (if needed)
- Posting the listings to Mercari or Poshmark
We’ll look at how to carry out each step in detail.
Importing existing inventory from Poshmark or Mercari to Crosslist
Crosslist has an excellent import tool that lets you import your listings in bulk — either all at once or in batches.
Whether you have a large inventory of 100+ items, or a small one with just 20 items, if you’re going to be cross listing your full inventory, importing everything all at once is the best way to go about it. Not only will this save you a lot of time, you’ll also have the certainty of knowing that no listing has been missed.
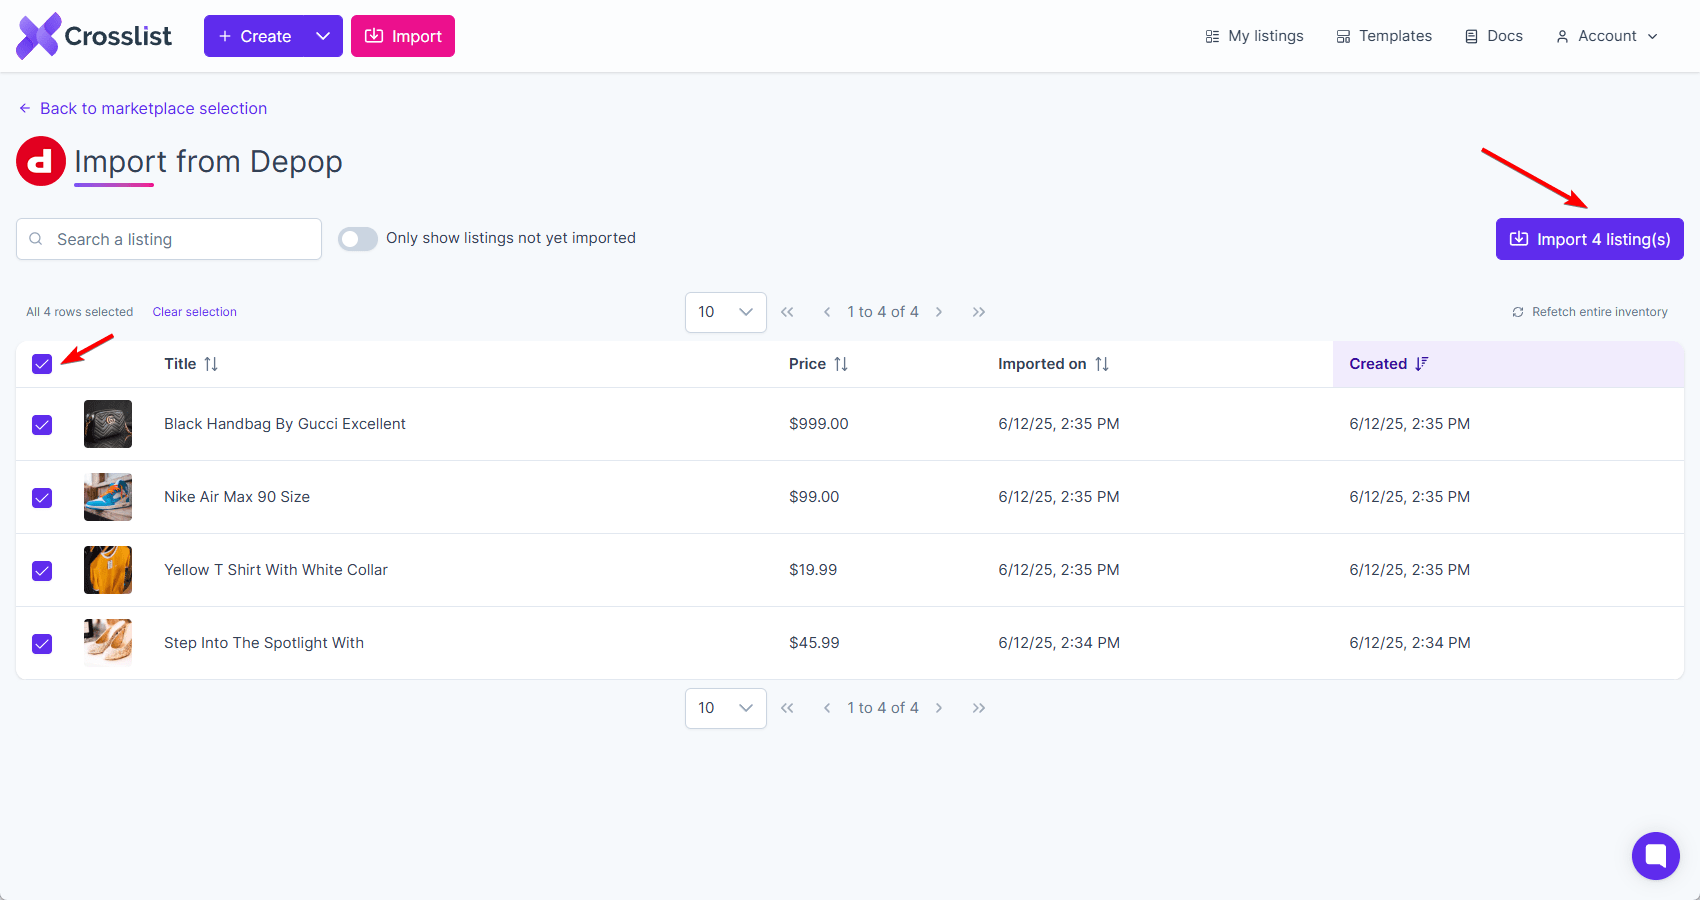
To start importing, head to Crosslist’s dashboard and select the Import button at the top of your screen.

Crosslist will now show you a list of all the 11 marketplaces it supports. Choose the marketplace you want to import from. In this case, that would be Poshmark (or Mercari).

Once you select, Crosslist will automatically start syncing all of your listings from that specific marketplace. This is indicated by a yellow sync text that you’ll be able to see at the top right of your screen.
Give our tool a few minutes to finish syncing your inventory — especially if you have a large volume of listings. Once the syncing is complete, you can choose which listings you want to import.
You can either:
- Import all of your listings at once, or
- Import your Poshmark or Mercari listings in batches (up to 100 listings supported in a single batch)
Choose the second option if you only want to cross post certain listings instead of your full inventory.
You can also use Crosslist’s bulk import tool’s advanced search feature to search and select any specific listings you’d like to import.
Let’s say you’re importing your Poshmark listings in batches according to product type. i.e. women’s clothing in the first batch, kid’s clothing in the second, and so on. Now, you obviously wouldn’t want to accidentally import the same listings twice.
There’s a very simple way to prevent this from happening on Crosslist. Simply toggle the “Only show listings not yet imported” button you see near the search bar, and you won’t have to worry about over-importing the same listings more than once!
When you’re done selecting your listings, click on the Import listings button on the top right corner of your screen, and voila! Your inventory is now in Crosslist, ready to be posted to Mercari (or Poshmark).

📝 Note: Crosslist also never asks for your login info, so your data is safe with you. If you want some extra peace of mind, you can install a firewall management system.
Enhancing/ adding missing details to your imported listings
Not all marketplaces have the same listing field attributes. For instance, a certain platform might ask you for information about your stock quantity, while another might not.
So, when cross listing from one marketplace to another, you may have to fill in some additional platform-specific details. For instance, you may have to fill in the “smart pricing” category needed for Mercari.
Smart pricing lets you set a floor price for your items in addition to your listing price. If your product isn’t selling, Mercari will gradually decrease the price automatically till it reaches the floor price.
Poshmark, on the other hand, has the following platform-specific fields:
- Original price, i.e. the retail price of the product. (If you don’t want buyers to know this, you can simply set this field as 0. But you do have to enter something here as it can’t be left blank.)
- Availability of the product. Crosslist will automatically set this to “For sale.” You can also choose “Not for sale” if a particular item is reserved for a buyer. Expecting some inventory soon? You can create excitement by setting the availability as “Drops” with the date on which it’ll become available for sale.
Even if you don’t have any edits to make, you can enhance your product images, add video listings, or edit your product descriptions.
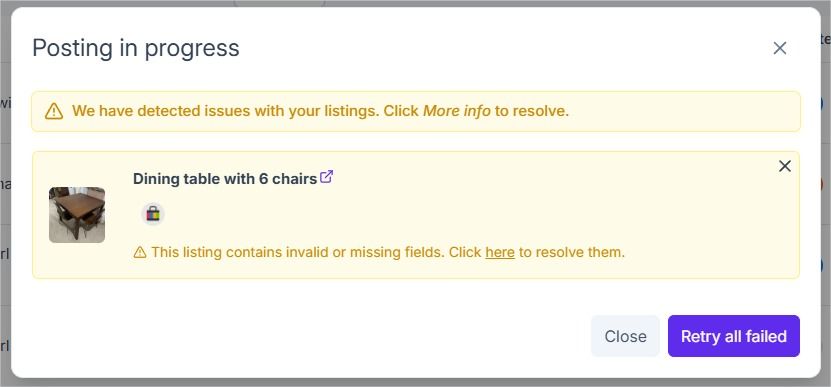
📝 Note: You can skip this step and head directly to the next one, i.e. posting the listings. In case any additional details need to be added, Crosslist will automatically prompt you to fill them in.
You’ll get a message like this: 👇

Posting your listings
The next — and final — step is posting your listings. Again, you can do this one by one or in bulk.
To cross post a single listing, click on it from the listings overview, select the marketplace(s) you want to post it to (which would be Mercari or Poshmark in this case), and click the Post button on the bottom left corner.

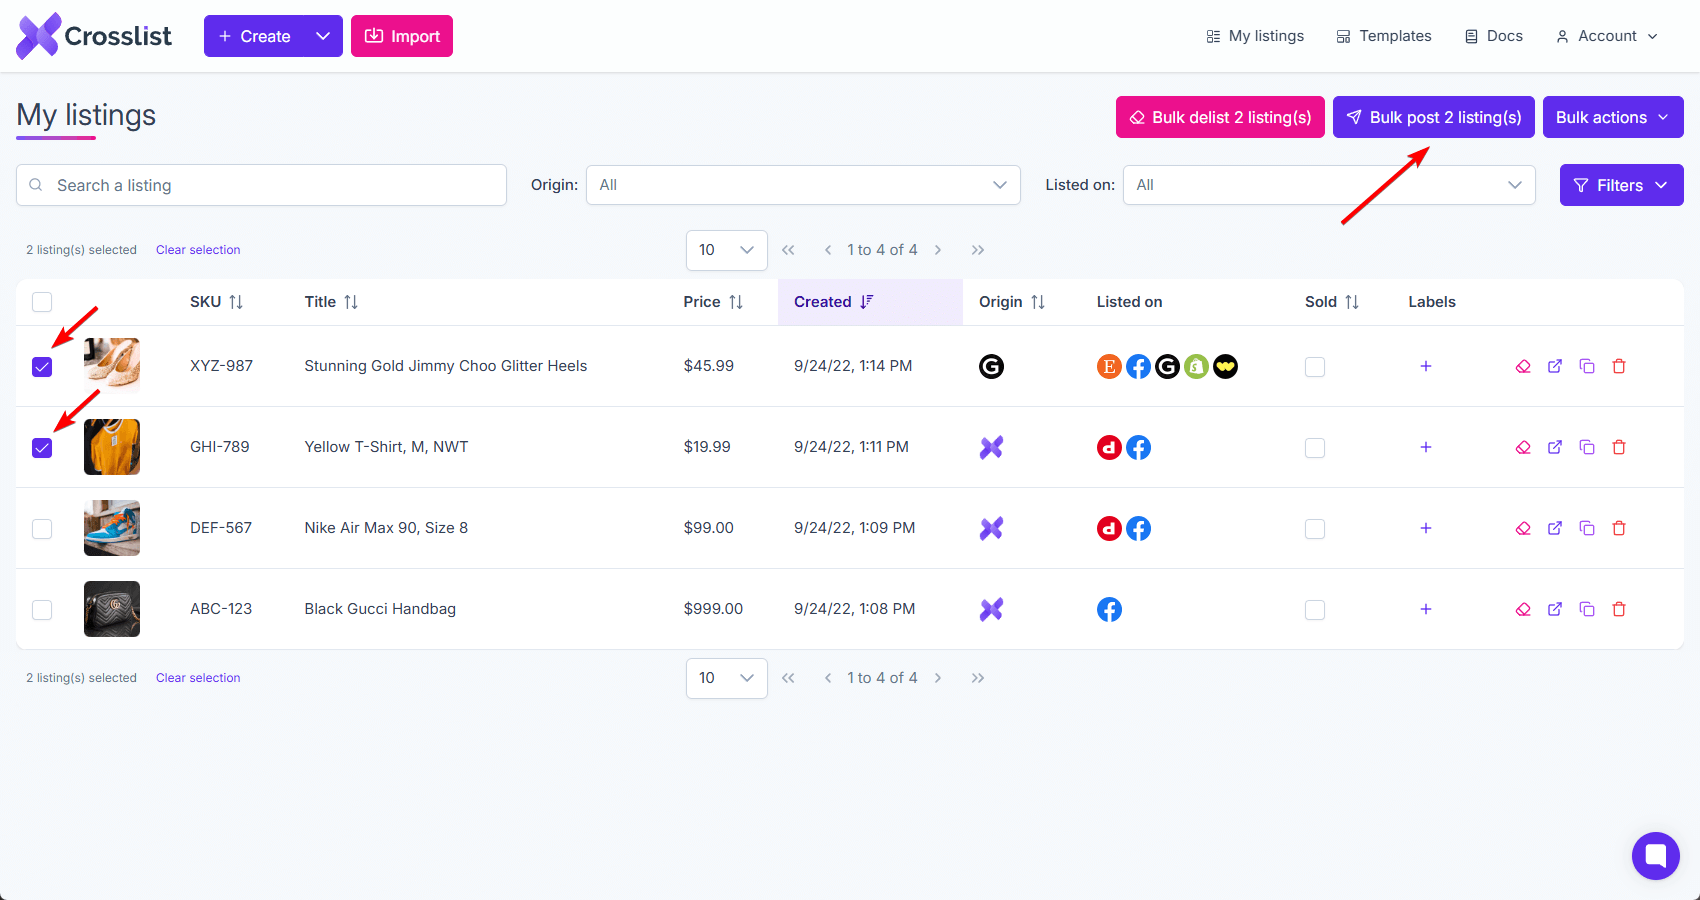
If you want to post in bulk, select all the listings from the listing overview by checking the boxes next to them. Then, click on the Bulk post (x) listings button on the top right of the screen.

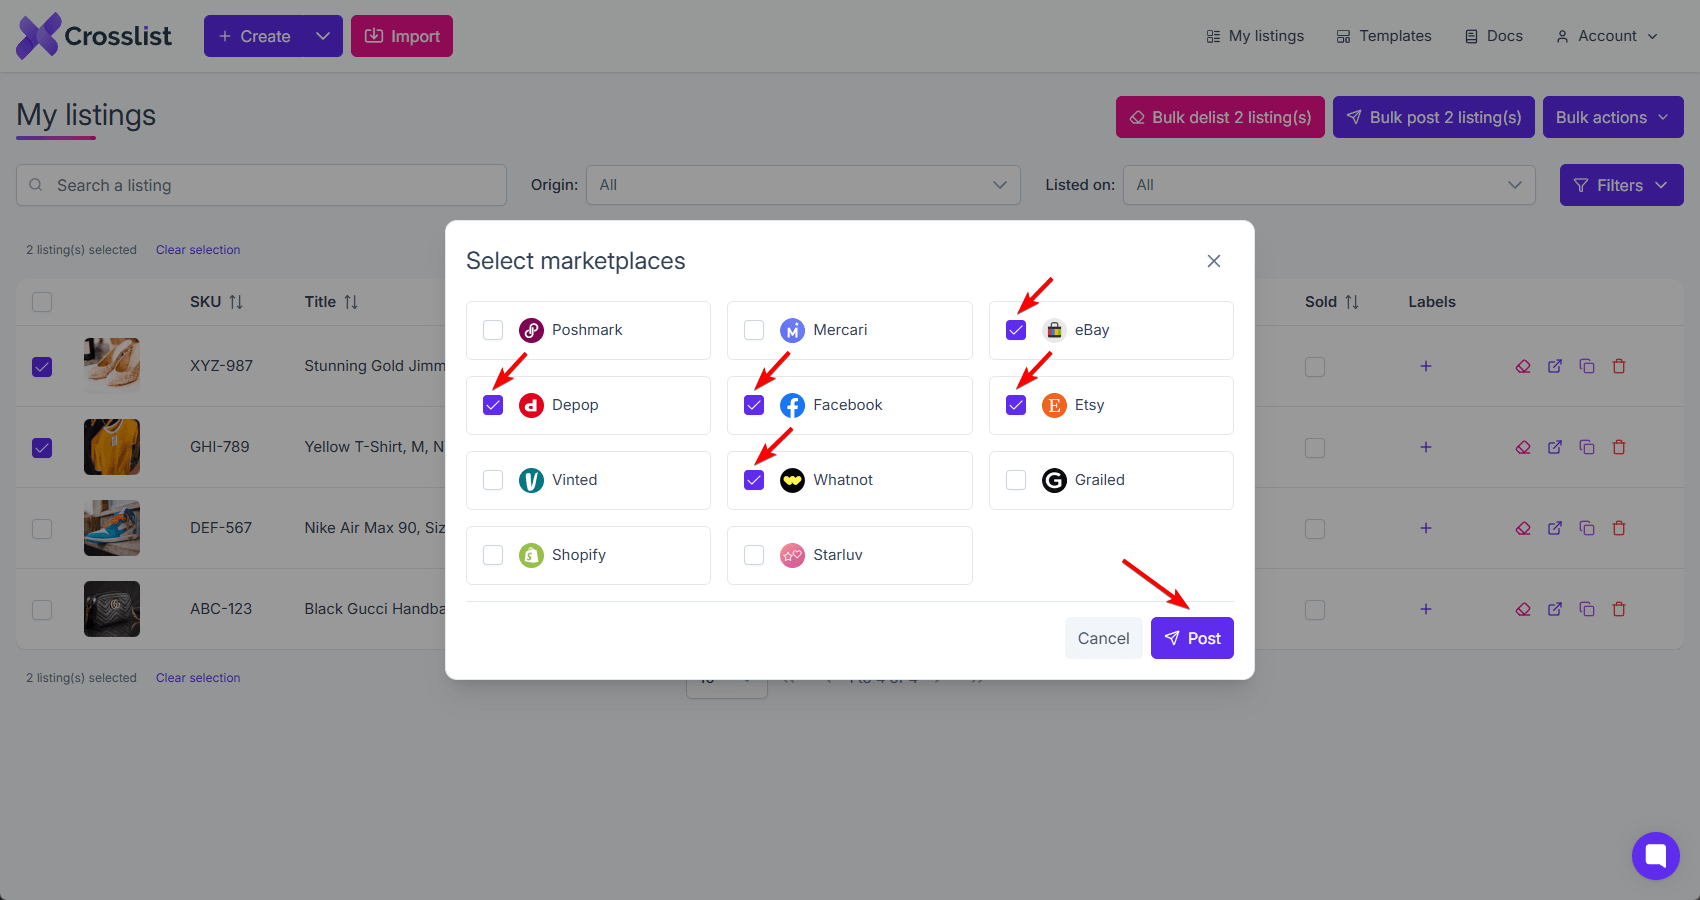
You’ll be prompted to choose the marketplace(s) you want to post them on. Once you’re done, click the Post button.
Your work is now done! Crosslist will automatically post all of your listings in the background. There’s no more manual intervention needed from you.

📝 Note: 1. Crosslist uses a queuing system to gradually distribute all of your listings to help protect your accounts from rate limits.
2. Our cross posting tool also opens only a single tab per marketplace — regardless of the number of listings you’re cross posting. This prevents your computer from becoming sluggish, meaning you can continue using it even as Crosslist works in the background.
3. Cross listing in reverse (i.e. from Mercari to Poshmark) works in the exact same way, except you’ll be importing your listings from Mercari and posting it to Poshmark!
FAQs
Is Crosslist safe to use when transferring listings from one marketplace to another?
Yes, Crosslist is absolutely safe to use! Since it’s a browser extension, it only uses your computer and browser to transfer listings. There’s no direct link between our servers and the marketplaces we support.
We also comply with the Terms of Service detailed by each of the marketplaces, so our tool isn’t considered spam and won’t disrupt any of the sales channels.
What else can I use Crosslist for other than transferring my inventory?
In addition to cross listing from one marketplace to another, you can use Crosslist to:
- Create new listings and simultaneously post it to 11 marketplaces at once
- Delist and relist your listings to keep them fresh
- Manage your inventory from a single dashboard
- Generate product descriptions with our AI add-on
- Get smart and competitive pricing suggestions for items based on marketplace trends
- Enhance your product images
- Set default shipping profiles for all marketplaces
- Stay active on Poshmark using our free Poshmark automation bot
👉 Here’s a detailed overview of Crosslist’s features and how they can help resellers like you
Here’s what our customers have to say about Crosslist’s bulk import tool:
“Great platform to use. The bulk import and bulk posting is a huge asset to my business.”
-Daniel Richardson, Trustpilot
“This is my favorite tool that I work with. It is so easy to import listings from sites you are signed up for and post them on your other platforms in seconds. I also really appreciate how it helps you find errors in the listings you already have.”
-Brittany Kline, Trustpilot
Try Crosslist for yourself and see!
Questions or just say hello!
Well, congratulations to you for making it this far! Here’s a reward in the form of a 10% discount code on your first month of Crosslist (add during check-out). Sign up now with a 3-day money-back guarantee!
10% off
BLOG10
You can learn more about how Crosslist works here.
If you have further questions, feedback, bug reports, or want to know a bit more about us, why not swing by for a chat and say G’day! You can have a chat with us through Messenger.

I sell on eBay, Etsy, poshmark, my own site etc. what platforms you offer to cross list?
Hi Kwok,
We support the following marketplaces: eBay, Poshmark, Mercari, Kidizen, Tradesy, Facebook Marketplace, Vinted, Grailed and Depop.
Hope that helps!
Can I use my phone with this app? I currently don’t own a computer.
Hi Carolina,
Unfortunately, while you can create and edit listings using your mobile phone, you do need a laptop or computer to be able to post your listings.
I’m so new at this internet stuff. Is a notebook the same as a computer?
Hi Stephanie,
Yes, a notebook is a portable computer.
To use Crosslist to its fullest extent, you need any computer that runs Windows or OS X with Google Chrome installed.
Hope that helps!
– Crosslist