


Maybe it’s a seasonal downturn, a lack of visibility, or some good old post-holiday shopping slump.
No matter the reason, though, your Mercari sales are suffering, and that’s a problem you need to fix.
You may already have tried a variety of visibility boosting tactics, such as dropping your prices by using the “Promote” feature, with little to no luck.
How do you increase your Mercari sales, then?
The answer lies in relisting your old listings on Mercari. Not only is this strategy easy, it’s also completely free. Let’s explore how to relist on Mercari to 5x your sales.
Key takeaways
Relisting on Mercari means deleting a stale listing and posting it again as a new one, which resets its spot in search and gets it back in front of buyers.
Mercari's algorithm favors fresh listings, so a relist gives older items a "freshness bump" and a real shot at selling.
Wait at least 40-60 days before relisting the same item. Doing it too often can get your account flagged and turns off repeat buyers.
Relisting manually (copy details, delete, repost) works for an item or two but eats about 10 minutes each.
Crosslist relists in bulk within minutes and auto-delists sold items so you don't double-sell across marketplaces.
What is Mercari relisting?
Mercari relisting refers to deleting old Mercari listings that have gone stale and creating identical (or updated) listings for the same products.
When you relist on Mercari, you’re essentially listing something again to drive more visibility and sales.
To understand a Mercari relist better, imagine you run a physical store. You stock up on new inventory once every few days with the new items going at the front of the shelves.
So, every time someone buys something from you, they only peruse the items at the front, meaning some of your products stocked at the back become stale.
Obviously, you want to sell those products, too, so you come up with a strategy.
Every week, you take a few products from the back of the shelves, dust them off, and display them at the front.
This is exactly what Mercari relisting is to your online store. You’re taking your old listings and bringing them back to the front by listing them again.
You can either relist on Mercari manually, or use a Mercari relisting tool like Crosslist to speed up the process, but more on that later.
Benefits of relisting on Mercari
A Mercari relist strategy gives your forgotten listings a second wind, increasing their chances of getting sold.
Why? Because Mercari's algorithm gives preference to newer listings, showing them first to users, and a relist is counted as a new listing.
Here are the benefits of a Mercari relist in detail:
SEO boost: New listings on Mercari get an initial “freshness bump,” appearing toward the top of search results. If you sell coats and relist your listings, users searching for the product will see your items within the first few search results. However, if you leave your old listings to gather dust, users might not see your items even if they scroll farther down, costing you sales.
Increased visibility: Relisting on Mercari places your items at the top of the “Newly Posted” and “Best Match” news feeds, which means even casual browsers can see your listings. The platform also sends out an instant notification to users who set up saved searches for products or brands. Together, these two things increase your visibility.
Inventory refresh: When you refresh (i.e. relist) old listings on Mercari, it refreshes your inventory, while also signaling to potential buyers that you are active and selling. It also gives users a better idea of what items are still in stock, as people tend to assume that products in old listings have been sold.
More sales: By relisting on Mercari, you’re putting your items in front of more people, which leads to more sales.
When should you relist on Mercari?
While you can relist on Mercari at any time, it's generally best to wait until a listing has gone stale. In most cases, that means waiting at least 40 to 60 days after the listing was first published.
Apart from this, you should do a Mercari relist if:
You want to make significant changes to your listing details, such as price, description, etc. — either because you want to reflect the current market trends, or because you made changes to the product itself and want the listings to reflect that
You notice that your listings have stopped getting any watch counts, likes, or shares, essentially rendering them invisible
You haven’t made a single sale on certain listings for over a month
You have multiple variants of a product, but haven’t sold even a single item of certain variants
You sell seasonal items and the holiday season is about to start, creating more demand for your products
Selling across several platforms? Here's how to delist and relist across multiple marketplaces.
How often should you relist on Mercari?
While having a Mercari relist strategy with periodic refreshes can help you increase your ROI, you should also be careful not to relist the same listings too often.
As a rule of thumb, wait at least 40-60 days before refreshing a listing.
This not only gives your listings time to accumulate statistics (such as views and likes) and make a sale, it also saves your account from being flagged for suspicious activity.
This may result in an account suspension, restriction, or even termination.
Moreover, relisting the same listings too frequently also isn’t good for business, because any potential buyer who checks out your account will see the same listings again and again.
This signals that you don’t have any new stock to sell, which can turn even interested buyers away.
How to relist on Mercari manually
Follow this simple step-by-step process to relist on Mercari manually.
Step 1: Log in to your Mercari account and head over to the specific listing you want to relist.
Step 2: Copy all the listing details, such as the title, description, tags, price, and photos into a separate document and delete the listing from Mercari.
Step 3: Open a new listing on Mercari and populate the listing fields with the details you just copied over. If needed, you can make changes to the details as well.
Step 4: Post the listing, and that’s it! You’ve successfully relisted on Mercari.
This manual Mercari relisting process is fine for a relist or two, but it isn’t really practical for bulk relists (which are a must-have if you’re a serious seller with a sizable inventory).
Think about it. If relisting a single Mercari listing manually takes 10 minutes, then just six relists are enough to eat up an hour of your time.
If you were to relist 10 or 20 listings? That would be hours worth of time wasted; hours that would have been better spent on business strategy.
Enter: a product relister for Mercari like Crosslist, which automates the relisting process. Crosslist only takes minutes to bulk relist on Mercari, saving you hours of your time.
Here’s how using a Mercari product relister like Crosslist compares to doing it manually.
Relisting on Mercari manually | Relisting with Crosslist |
Slow and tedious; consumes hours of your time | Fast and easy; only takes minutes even if you do a bulk Mercari relist |
Energy-intensive | Only takes the click of a few buttons |
Highly prone to error | Error-free |
Bottom line: Using Crosslist for Mercari like Crosslist makes relisting quicker, easier, and smarter.
We’ll show you how it works.
Autodelist: what happens when an item sells?
One thing many relisting guides don’t talk about is what happens after an item sells on Mercari.
If you’re selling the same item across multiple marketplaces, a sale on one platform does not automatically remove it from the others.
Until you manually delist the item everywhere else, it can still be purchased by another buyer, without you noticing.
If it happens, you've double-sold. You’re forced to cancel an order, issue a refund, and potentially deal with negative feedback or marketplace penalties.
The more platforms you sell on, the easier it becomes to lose track of inventory manually.
This is why autodelist exists. Tools like Crosslist can detect when an item sells on any connected marketplace and automatically remove the listing from every other platform.
That means less manual checking, fewer mistakes, and a much lower risk of double-selling.
Note: for some marketplaces, this requires your desktop app or browser extension to be running in the background.
These solve two different problems: relisting refreshes stale inventory to boost visibility, and autodelist protects sold inventory from double-selling.
If you're selling on more than one marketplace, you need both.
How to relist on Mercari in bulk (with Crosslist)
This 4-step framework walks you through relisting in bulk with Crosslist. The whole process will only take you a few minutes, at most.
Before you begin, though, you need to sign up for a Crosslist subscription (if you don’t have one already) since the process is going to happen inside the tool.
All of Crosslist’s pricing plans are affordable. We also offer a 3-day money-back guarantee if you relist 20 or fewer listings, so you can try out Crosslist risk-free.
Step 1: Import your existing Mercari inventory to Crosslist
The first step is bringing your existing Mercari listings to Crosslist.
If you’ve been a Crosslist user for a while, and have your Mercari listings within the tool already, feel free to skip this step and go ahead to the next one.
To the others who just signed up to Crosslist, log in and go to your account dashboard.
Spot the Import button at the top left corner of the screen and click on it.

You’ll see a pop-up with all the 11+ marketplaces supported by Crosslist.
Since the goal here is to import your Mercari inventory, choose the platform from the list.
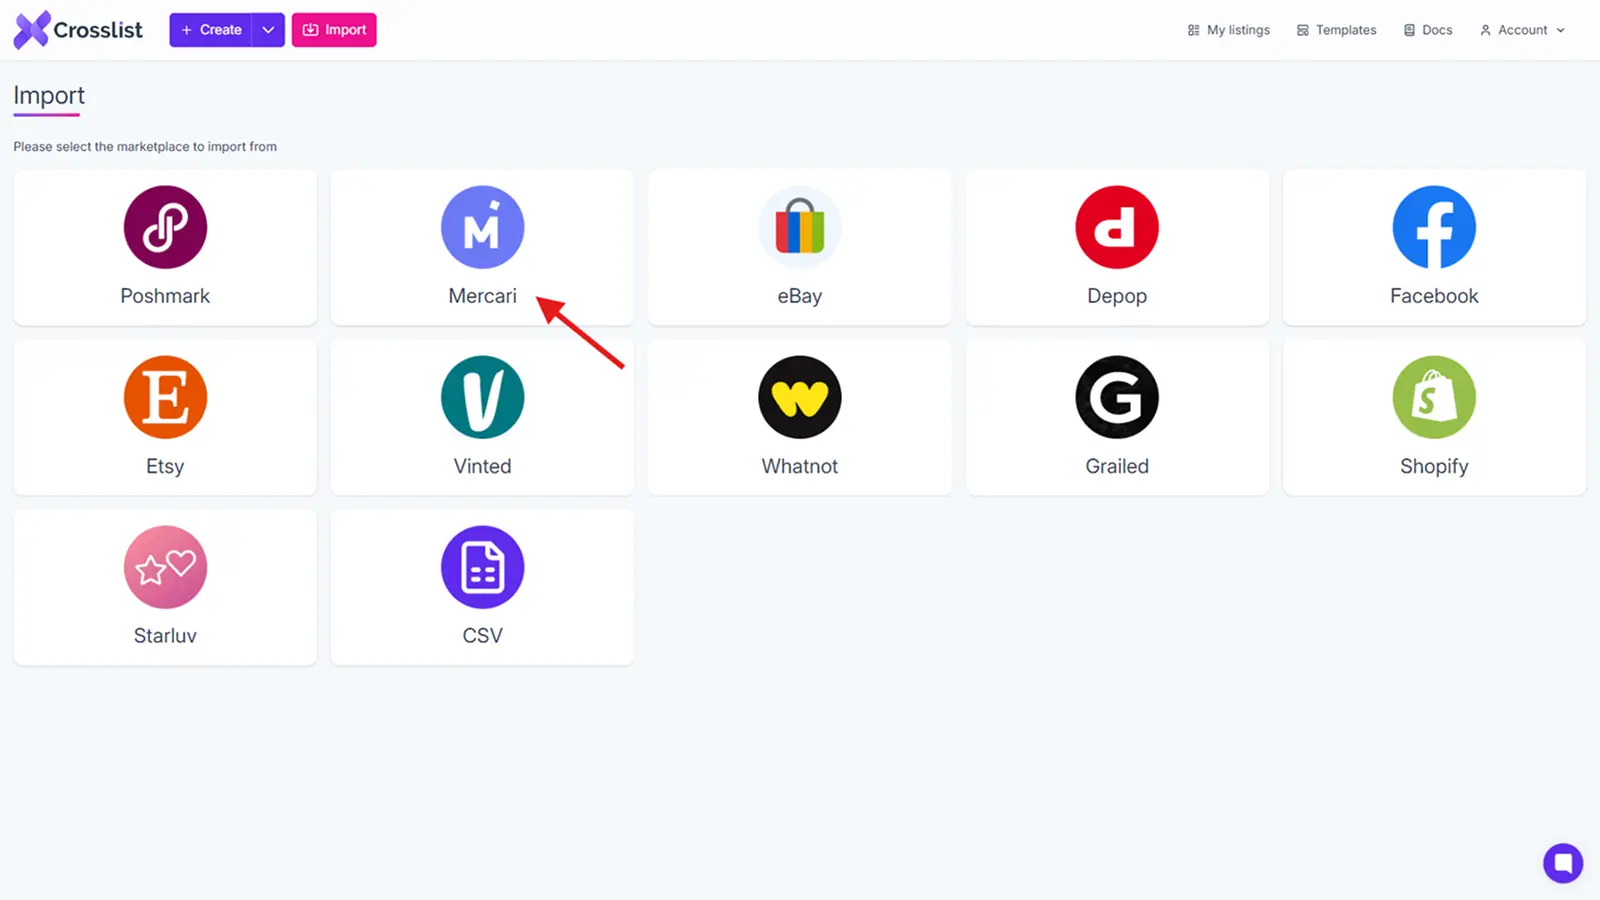
You’ll see a yellow sync button on the screen. This is an indication that Crosslist is syncing your Mercari listings, preparing to bring them in.
Give it a few minutes, especially if you have a voluminous inventory.
Once the syncing is done, you have two options to import your inventory.
1. Importing your entire Mercari inventory at the same time (whether you have 50 listings or 500)
You should choose this option if each of your listings are active, and if you plan on relisting all of them, either now, or at some point in the future.
Think about it. If your plan is to relist only 10 listings now, and 10 next week, it’s better to import all of them now.
Otherwise, you’ll have to go through the motions of importing them to Crosslist again next week, so you might as well save yourself the hassle and do it now.
Having all of your listings on Mercari also makes it easier for you to cross list to other platforms, if the need ever arises.
Crosslist is also capable of importing large volumes of inventory in one go, making your job easier.
2. Importing your Mercari listings in batch (with each batch supporting a maximum of 100 listings)
However, if there are a few products that you’re planning to stop selling, excluding them from the import process might be the better choice.
Or, maybe you’re waiting to stock up on some items before selling them (which might take months).
Or, perhaps, you’ve made significant changes to the products that their original listings no longer fit.
In all of the above cases, importing in batches might be your best bet. With Crosslist’s advanced search bar, you can easily search for and select the specific listings you want to bring in.
To prevent yourself from accidentally importing the same listings twice, toggle the Only show listings not yet imported button.
Made all your selections? Time to hit that Import button and set the process in motion.
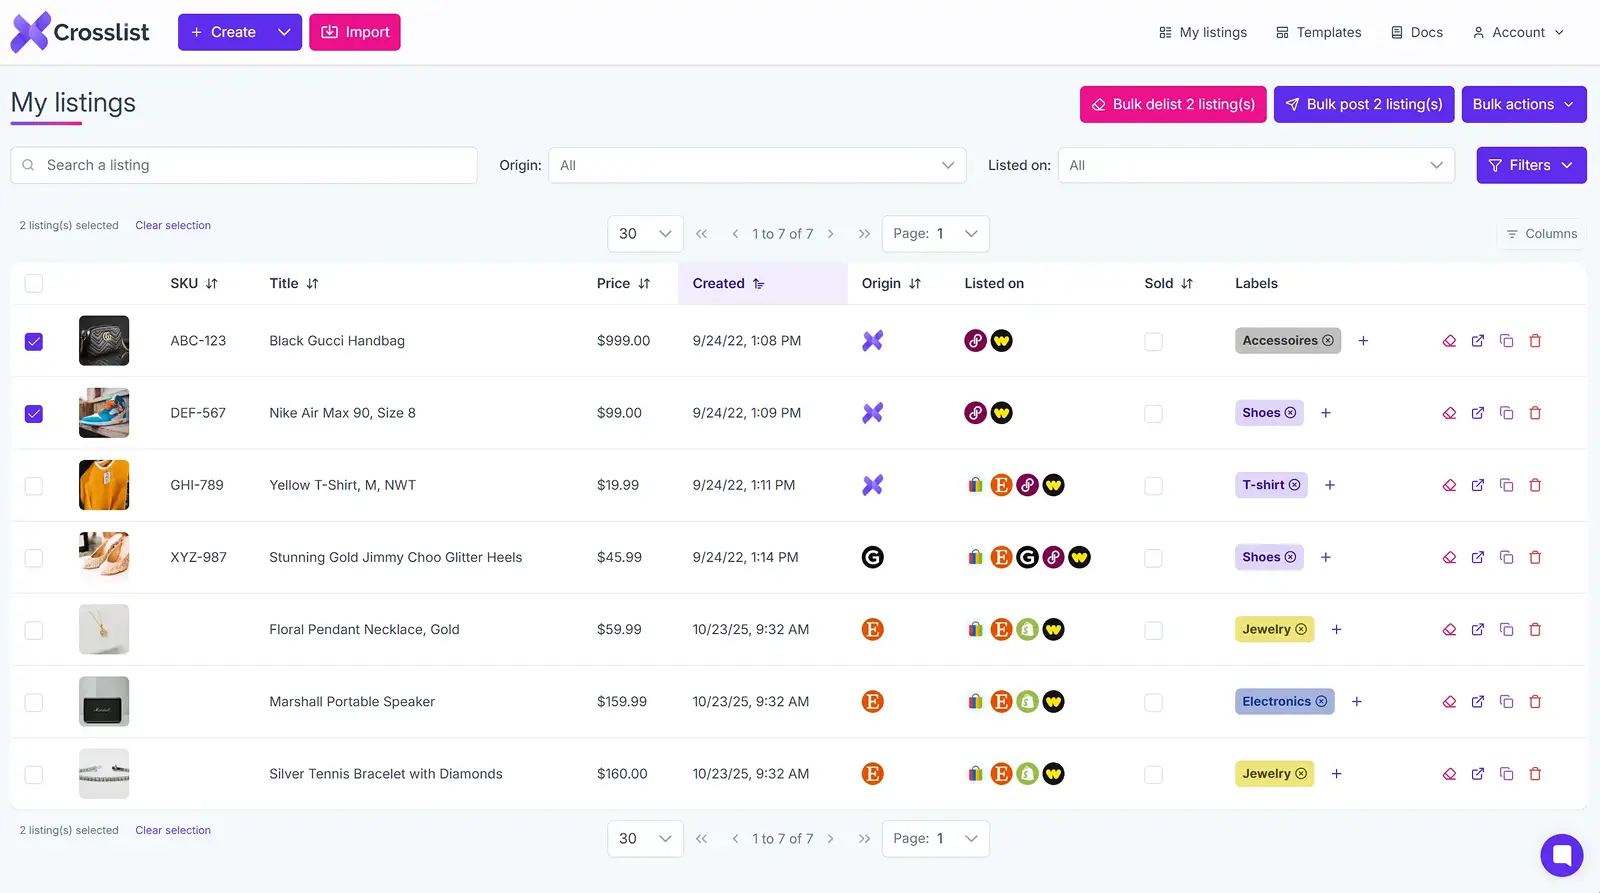
Step 2: Navigate to the listing overview on Crosslist
Once Crosslist has imported your Mercari inventory, you’ll see it in the listing overview, which is just the dashboard.
The page will contain the following information about your listings:
Listing title
Preview image of the product
SKU number (if available)
Original date on which the listing was created
Listing price
Listing origin, i.e. the place where the listing was created (if you created it in Mercari and imported it, the origin will be “Mercari.” But, if you created the listing within Crosslist, the origin will be “Crosslist”)
All the marketplaces it has been listed on
Any labels you’ve added to the listing for easy filtering

Since you’re going to relist on Mercari, you’re going to want this listing overview to only show you your Mercari listings.
If you just signed up to Crosslist and imported your inventory, you don’t have to do anything as your Mercari listings are the only ones available to display.
If you were already a Crosslist user, though, you’ll have to either:
Tweak the Origin tab to only show the listings that originated from Mercari
Use the Listed on tab to only display listings that are live on Mercari
💡 Instead of just relisting your listings as they are, updating them with new and relevant information can boost their visibility even further.
For instance, you can tweak your title, change your prices to reflect current market trends, use newer, more high quality photos, or update your product description.
While you can make these edits manually, Crosslist gives you an easier option to do them in bulk. Here’s how:
To edit the prices of your listings in bulk, use Crosslist’s price markup feature, which can be accessed through Account settings → Price markup. Just enter a number or percentage in the box beside Mercari. If you add an absolute number, i.e. $10, the prices of your listings will increase by $10. If you add a percentage, i.e. 10%, the prices of your listings will increase by 10%. If you want to decrease your prices, add a negative number or negative percentage.
To make similar edits to your listings in bulk, open a new Crosslist template and make the change there. Then, simply apply the template to all of your listings. For more details, check out this in-depth guide on editing listings in bulk using templates.
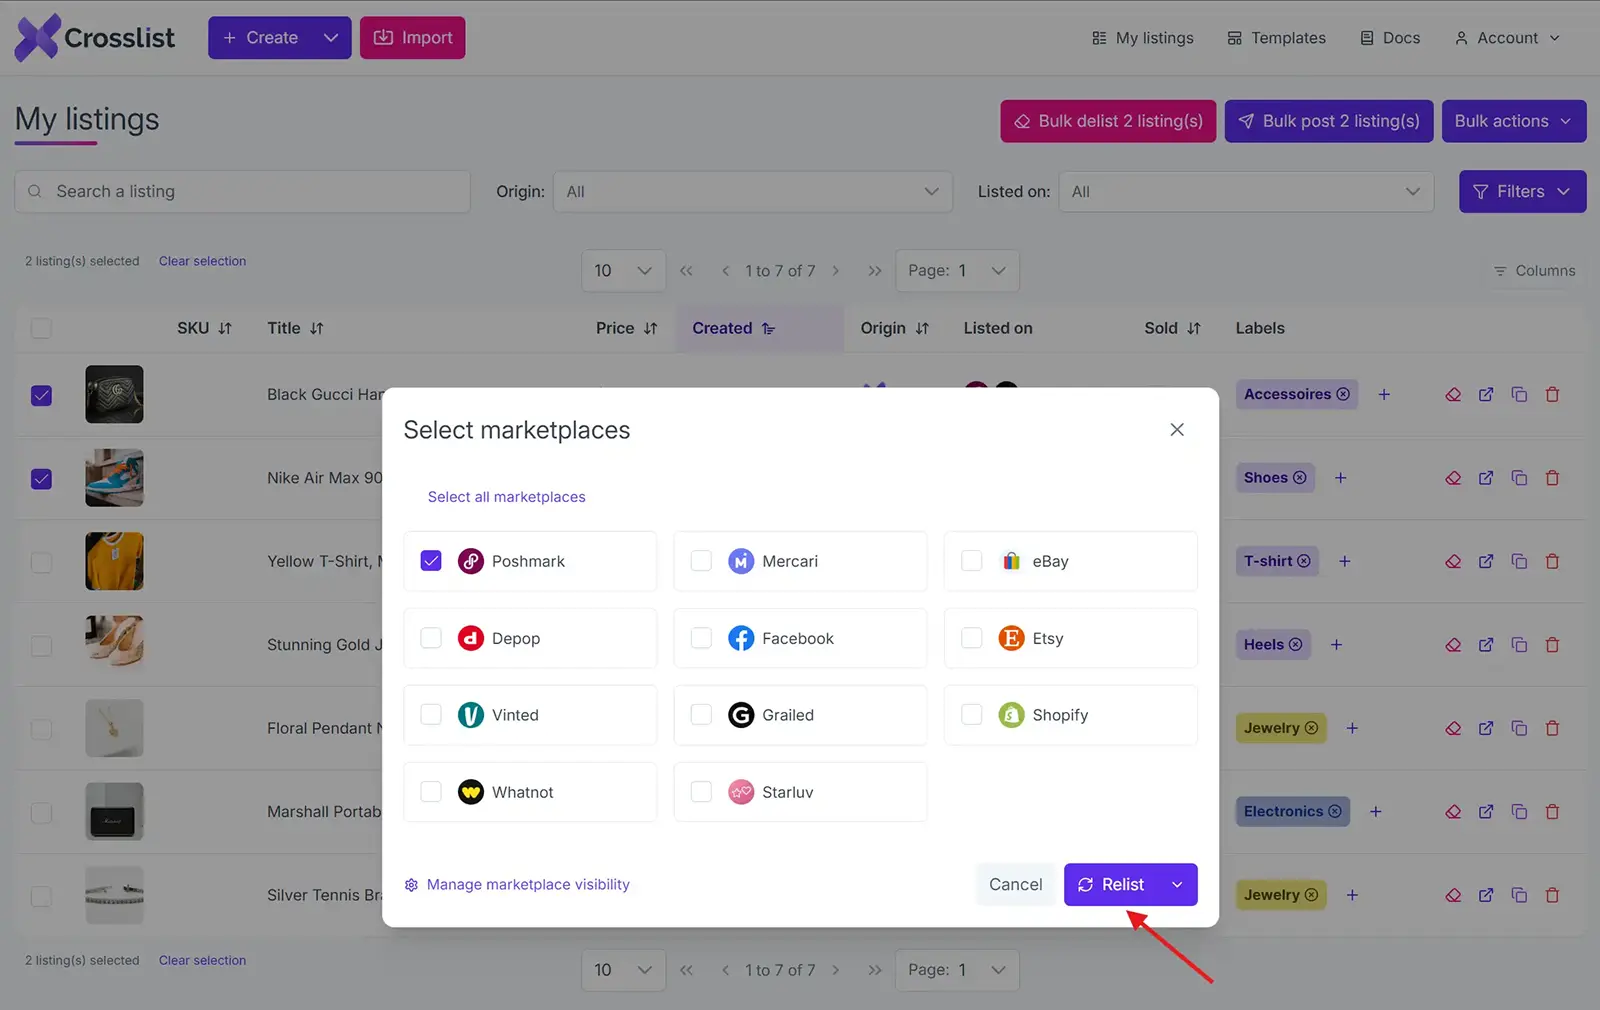
Step 3: Select the listings you want to relist on Mercari
From the listing overview, pick the listings you want to relist now. You can use your added listing tags to filter more effectively.
If you want to relist your full Mercari inventory, simply select all by checking the box at the very top of the first displayed listing.
Relisting on Mercari is, technically, a two-step process. You need to delist the existing listing first before you can relist it again.
But, Crosslist automatically takes care of this, leaving no extra steps for you.
Crosslist also relists your entire inventory in bulk within minutes.
Once you’ve selected the listings, click on the Bulk post (x) listings button at the top right corner of the screen.
You’ll see the same pop-up with Crosslist’s supported marketplaces again. Select Mercari.
Step 4: Click on the “Relist” button
For the final step, hit that Relist button at the bottom of the pop-up. Aaaaand you’re done!
There’s no more manual intervention needed from your side. Unlike many other cross listing platforms, Crosslist automatically posts your listings to Mercari.
With Crosslist, you also don’t have to worry about your account falling victim to rate limits or being suspected for bot activity.
This is because Crosslist uses a queuing system that distributes listings at periodic intervals.
Relisting a single listing on Mercari
While the above method is suitable for relisting in bulk and separately, there’s an easier way for the latter.
After importing your inventory, go to the listing overview and select the specific listing you want to relist.
Click on the listing, which will open up the listing details page. Check the details and make any edits, if necessary.
From the left side of the screen, choose Mercari from the list of marketplaces.
Click on the Relist button at the bottom. That’s it!
Mercari relisting tool: why Crosslist?
Crosslist is more than a Mercari relisting tool. It handles the repetitive work of relisting in bulk so you can focus on sourcing and selling, and it does a lot more once you're set up.
Fill out one dynamic form and post to every major marketplace at once. No separate form per platform, the way most cross listing apps still make you do it.
Want to relist on the go? You can edit, and manage your inventory straight from your phone with the mobile app.
When an item sells on any connected marketplace, Crosslist detects the sale and removes the listing everywhere else with autodelist.
If you're not sure what to edit, just upload your photos and Crosslist generates complete listings with AI, including titles, descriptions, condition, and competitive pricing.
The AI photo editor cleans up images and removes backgrounds in bulk, with unlimited removals on every plan.
And because Crosslist supports the US, UK, Canada, and Australia, you can expand into regional marketplace variants most competitors can't reliably handle.
Here's what sellers say:
“This is a game changer. Keeps all inventory in one place, easy to delist and relist. Not just for huge resellers, it has saved me so much time and increased my sales. It pays for itself many times over.”
— Lorraine F., Trustpilot
Relisting is just one way to keep your Mercari sales moving. Try Crosslist risk-free with our 3-day money-back guarantee.
Maybe it’s a seasonal downturn, a lack of visibility, or some good old post-holiday shopping slump.
No matter the reason, though, your Mercari sales are suffering, and that’s a problem you need to fix.
You may already have tried a variety of visibility boosting tactics, such as dropping your prices by using the “Promote” feature, with little to no luck.
How do you increase your Mercari sales, then?
The answer lies in relisting your old listings on Mercari. Not only is this strategy easy, it’s also completely free. Let’s explore how to relist on Mercari to 5x your sales.
Key takeaways
Relisting on Mercari means deleting a stale listing and posting it again as a new one, which resets its spot in search and gets it back in front of buyers.
Mercari's algorithm favors fresh listings, so a relist gives older items a "freshness bump" and a real shot at selling.
Wait at least 40-60 days before relisting the same item. Doing it too often can get your account flagged and turns off repeat buyers.
Relisting manually (copy details, delete, repost) works for an item or two but eats about 10 minutes each.
Crosslist relists in bulk within minutes and auto-delists sold items so you don't double-sell across marketplaces.
What is Mercari relisting?
Mercari relisting refers to deleting old Mercari listings that have gone stale and creating identical (or updated) listings for the same products.
When you relist on Mercari, you’re essentially listing something again to drive more visibility and sales.
To understand a Mercari relist better, imagine you run a physical store. You stock up on new inventory once every few days with the new items going at the front of the shelves.
So, every time someone buys something from you, they only peruse the items at the front, meaning some of your products stocked at the back become stale.
Obviously, you want to sell those products, too, so you come up with a strategy.
Every week, you take a few products from the back of the shelves, dust them off, and display them at the front.
This is exactly what Mercari relisting is to your online store. You’re taking your old listings and bringing them back to the front by listing them again.
You can either relist on Mercari manually, or use a Mercari relisting tool like Crosslist to speed up the process, but more on that later.
Benefits of relisting on Mercari
A Mercari relist strategy gives your forgotten listings a second wind, increasing their chances of getting sold.
Why? Because Mercari's algorithm gives preference to newer listings, showing them first to users, and a relist is counted as a new listing.
Here are the benefits of a Mercari relist in detail:
SEO boost: New listings on Mercari get an initial “freshness bump,” appearing toward the top of search results. If you sell coats and relist your listings, users searching for the product will see your items within the first few search results. However, if you leave your old listings to gather dust, users might not see your items even if they scroll farther down, costing you sales.
Increased visibility: Relisting on Mercari places your items at the top of the “Newly Posted” and “Best Match” news feeds, which means even casual browsers can see your listings. The platform also sends out an instant notification to users who set up saved searches for products or brands. Together, these two things increase your visibility.
Inventory refresh: When you refresh (i.e. relist) old listings on Mercari, it refreshes your inventory, while also signaling to potential buyers that you are active and selling. It also gives users a better idea of what items are still in stock, as people tend to assume that products in old listings have been sold.
More sales: By relisting on Mercari, you’re putting your items in front of more people, which leads to more sales.
When should you relist on Mercari?
While you can relist on Mercari at any time, it's generally best to wait until a listing has gone stale. In most cases, that means waiting at least 40 to 60 days after the listing was first published.
Apart from this, you should do a Mercari relist if:
You want to make significant changes to your listing details, such as price, description, etc. — either because you want to reflect the current market trends, or because you made changes to the product itself and want the listings to reflect that
You notice that your listings have stopped getting any watch counts, likes, or shares, essentially rendering them invisible
You haven’t made a single sale on certain listings for over a month
You have multiple variants of a product, but haven’t sold even a single item of certain variants
You sell seasonal items and the holiday season is about to start, creating more demand for your products
Selling across several platforms? Here's how to delist and relist across multiple marketplaces.
How often should you relist on Mercari?
While having a Mercari relist strategy with periodic refreshes can help you increase your ROI, you should also be careful not to relist the same listings too often.
As a rule of thumb, wait at least 40-60 days before refreshing a listing.
This not only gives your listings time to accumulate statistics (such as views and likes) and make a sale, it also saves your account from being flagged for suspicious activity.
This may result in an account suspension, restriction, or even termination.
Moreover, relisting the same listings too frequently also isn’t good for business, because any potential buyer who checks out your account will see the same listings again and again.
This signals that you don’t have any new stock to sell, which can turn even interested buyers away.
How to relist on Mercari manually
Follow this simple step-by-step process to relist on Mercari manually.
Step 1: Log in to your Mercari account and head over to the specific listing you want to relist.
Step 2: Copy all the listing details, such as the title, description, tags, price, and photos into a separate document and delete the listing from Mercari.
Step 3: Open a new listing on Mercari and populate the listing fields with the details you just copied over. If needed, you can make changes to the details as well.
Step 4: Post the listing, and that’s it! You’ve successfully relisted on Mercari.
This manual Mercari relisting process is fine for a relist or two, but it isn’t really practical for bulk relists (which are a must-have if you’re a serious seller with a sizable inventory).
Think about it. If relisting a single Mercari listing manually takes 10 minutes, then just six relists are enough to eat up an hour of your time.
If you were to relist 10 or 20 listings? That would be hours worth of time wasted; hours that would have been better spent on business strategy.
Enter: a product relister for Mercari like Crosslist, which automates the relisting process. Crosslist only takes minutes to bulk relist on Mercari, saving you hours of your time.
Here’s how using a Mercari product relister like Crosslist compares to doing it manually.
Relisting on Mercari manually | Relisting with Crosslist |
Slow and tedious; consumes hours of your time | Fast and easy; only takes minutes even if you do a bulk Mercari relist |
Energy-intensive | Only takes the click of a few buttons |
Highly prone to error | Error-free |
Bottom line: Using Crosslist for Mercari like Crosslist makes relisting quicker, easier, and smarter.
We’ll show you how it works.
Autodelist: what happens when an item sells?
One thing many relisting guides don’t talk about is what happens after an item sells on Mercari.
If you’re selling the same item across multiple marketplaces, a sale on one platform does not automatically remove it from the others.
Until you manually delist the item everywhere else, it can still be purchased by another buyer, without you noticing.
If it happens, you've double-sold. You’re forced to cancel an order, issue a refund, and potentially deal with negative feedback or marketplace penalties.
The more platforms you sell on, the easier it becomes to lose track of inventory manually.
This is why autodelist exists. Tools like Crosslist can detect when an item sells on any connected marketplace and automatically remove the listing from every other platform.
That means less manual checking, fewer mistakes, and a much lower risk of double-selling.
Note: for some marketplaces, this requires your desktop app or browser extension to be running in the background.
These solve two different problems: relisting refreshes stale inventory to boost visibility, and autodelist protects sold inventory from double-selling.
If you're selling on more than one marketplace, you need both.
How to relist on Mercari in bulk (with Crosslist)
This 4-step framework walks you through relisting in bulk with Crosslist. The whole process will only take you a few minutes, at most.
Before you begin, though, you need to sign up for a Crosslist subscription (if you don’t have one already) since the process is going to happen inside the tool.
All of Crosslist’s pricing plans are affordable. We also offer a 3-day money-back guarantee if you relist 20 or fewer listings, so you can try out Crosslist risk-free.
Step 1: Import your existing Mercari inventory to Crosslist
The first step is bringing your existing Mercari listings to Crosslist.
If you’ve been a Crosslist user for a while, and have your Mercari listings within the tool already, feel free to skip this step and go ahead to the next one.
To the others who just signed up to Crosslist, log in and go to your account dashboard.
Spot the Import button at the top left corner of the screen and click on it.
You’ll see a pop-up with all the 11+ marketplaces supported by Crosslist.
Since the goal here is to import your Mercari inventory, choose the platform from the list.
You’ll see a yellow sync button on the screen. This is an indication that Crosslist is syncing your Mercari listings, preparing to bring them in.
Give it a few minutes, especially if you have a voluminous inventory.
Once the syncing is done, you have two options to import your inventory.
1. Importing your entire Mercari inventory at the same time (whether you have 50 listings or 500)
You should choose this option if each of your listings are active, and if you plan on relisting all of them, either now, or at some point in the future.
Think about it. If your plan is to relist only 10 listings now, and 10 next week, it’s better to import all of them now.
Otherwise, you’ll have to go through the motions of importing them to Crosslist again next week, so you might as well save yourself the hassle and do it now.
Having all of your listings on Mercari also makes it easier for you to cross list to other platforms, if the need ever arises.
Crosslist is also capable of importing large volumes of inventory in one go, making your job easier.
2. Importing your Mercari listings in batch (with each batch supporting a maximum of 100 listings)
However, if there are a few products that you’re planning to stop selling, excluding them from the import process might be the better choice.
Or, maybe you’re waiting to stock up on some items before selling them (which might take months).
Or, perhaps, you’ve made significant changes to the products that their original listings no longer fit.
In all of the above cases, importing in batches might be your best bet. With Crosslist’s advanced search bar, you can easily search for and select the specific listings you want to bring in.
To prevent yourself from accidentally importing the same listings twice, toggle the Only show listings not yet imported button.
Made all your selections? Time to hit that Import button and set the process in motion.
Step 2: Navigate to the listing overview on Crosslist
Once Crosslist has imported your Mercari inventory, you’ll see it in the listing overview, which is just the dashboard.
The page will contain the following information about your listings:
Listing title
Preview image of the product
SKU number (if available)
Original date on which the listing was created
Listing price
Listing origin, i.e. the place where the listing was created (if you created it in Mercari and imported it, the origin will be “Mercari.” But, if you created the listing within Crosslist, the origin will be “Crosslist”)
All the marketplaces it has been listed on
Any labels you’ve added to the listing for easy filtering
Since you’re going to relist on Mercari, you’re going to want this listing overview to only show you your Mercari listings.
If you just signed up to Crosslist and imported your inventory, you don’t have to do anything as your Mercari listings are the only ones available to display.
If you were already a Crosslist user, though, you’ll have to either:
Tweak the Origin tab to only show the listings that originated from Mercari
Use the Listed on tab to only display listings that are live on Mercari
💡 Instead of just relisting your listings as they are, updating them with new and relevant information can boost their visibility even further.
For instance, you can tweak your title, change your prices to reflect current market trends, use newer, more high quality photos, or update your product description.
While you can make these edits manually, Crosslist gives you an easier option to do them in bulk. Here’s how:
To edit the prices of your listings in bulk, use Crosslist’s price markup feature, which can be accessed through Account settings → Price markup. Just enter a number or percentage in the box beside Mercari. If you add an absolute number, i.e. $10, the prices of your listings will increase by $10. If you add a percentage, i.e. 10%, the prices of your listings will increase by 10%. If you want to decrease your prices, add a negative number or negative percentage.
To make similar edits to your listings in bulk, open a new Crosslist template and make the change there. Then, simply apply the template to all of your listings. For more details, check out this in-depth guide on editing listings in bulk using templates.
Step 3: Select the listings you want to relist on Mercari
From the listing overview, pick the listings you want to relist now. You can use your added listing tags to filter more effectively.
If you want to relist your full Mercari inventory, simply select all by checking the box at the very top of the first displayed listing.
Relisting on Mercari is, technically, a two-step process. You need to delist the existing listing first before you can relist it again.
But, Crosslist automatically takes care of this, leaving no extra steps for you.
Crosslist also relists your entire inventory in bulk within minutes.
Once you’ve selected the listings, click on the Bulk post (x) listings button at the top right corner of the screen.
You’ll see the same pop-up with Crosslist’s supported marketplaces again. Select Mercari.
Step 4: Click on the “Relist” button
For the final step, hit that Relist button at the bottom of the pop-up. Aaaaand you’re done!
There’s no more manual intervention needed from your side. Unlike many other cross listing platforms, Crosslist automatically posts your listings to Mercari.
With Crosslist, you also don’t have to worry about your account falling victim to rate limits or being suspected for bot activity.
This is because Crosslist uses a queuing system that distributes listings at periodic intervals.
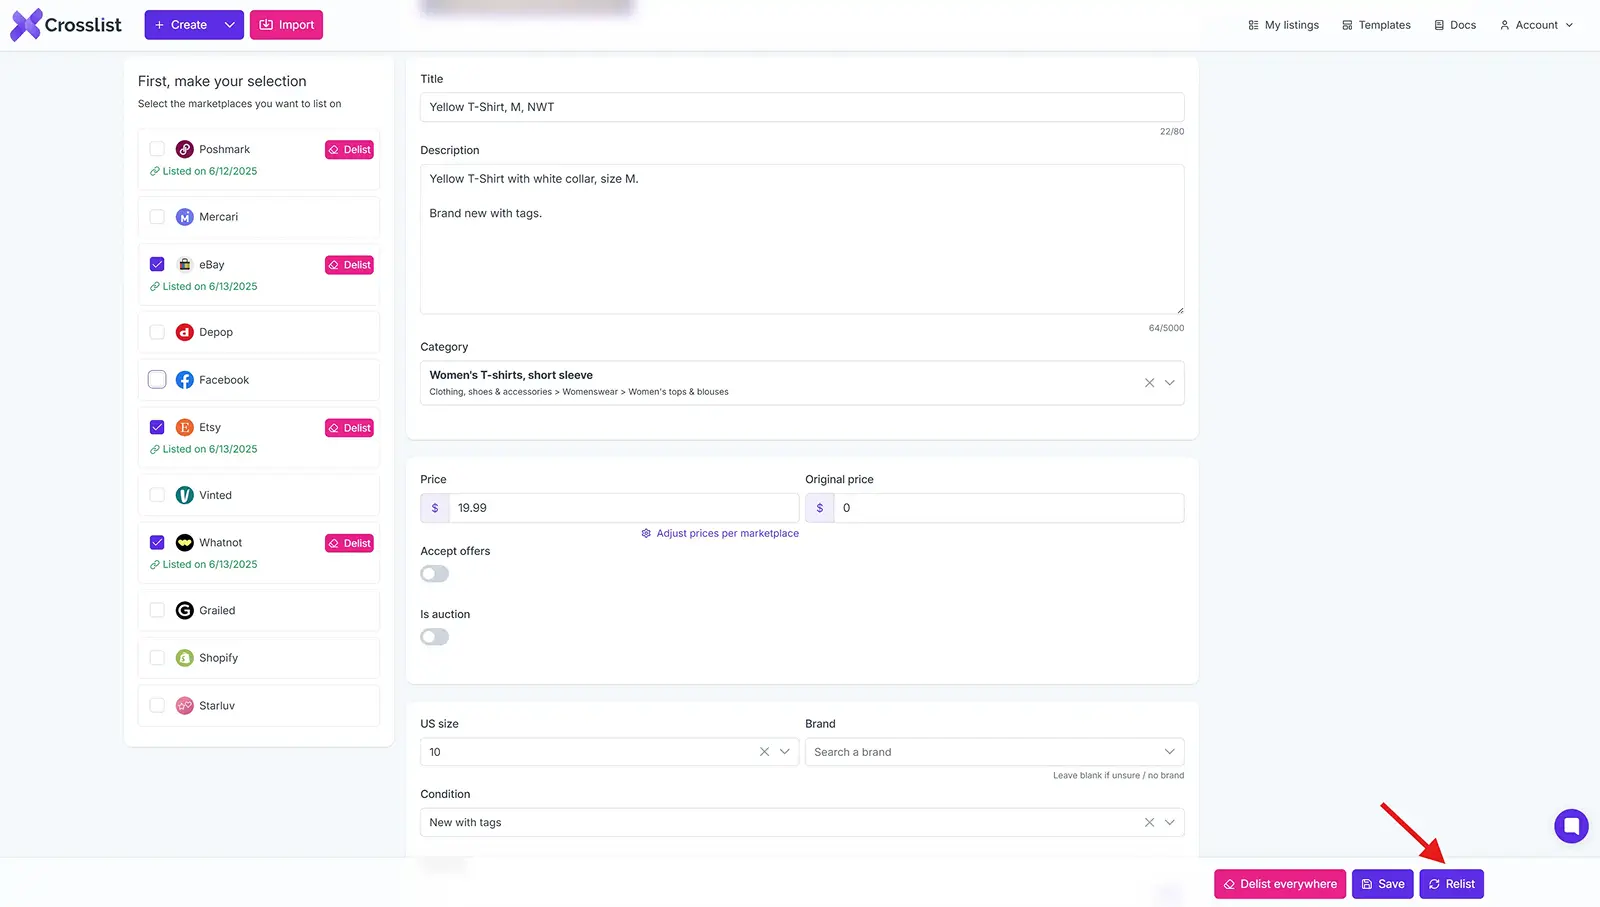
Relisting a single listing on Mercari
While the above method is suitable for relisting in bulk and separately, there’s an easier way for the latter.
After importing your inventory, go to the listing overview and select the specific listing you want to relist.
Click on the listing, which will open up the listing details page. Check the details and make any edits, if necessary.
From the left side of the screen, choose Mercari from the list of marketplaces.
Click on the Relist button at the bottom. That’s it!
Mercari relisting tool: why Crosslist?
Crosslist is more than a Mercari relisting tool. It handles the repetitive work of relisting in bulk so you can focus on sourcing and selling, and it does a lot more once you're set up.
Fill out one dynamic form and post to every major marketplace at once. No separate form per platform, the way most cross listing apps still make you do it.
Want to relist on the go? You can edit, and manage your inventory straight from your phone with the mobile app.
When an item sells on any connected marketplace, Crosslist detects the sale and removes the listing everywhere else with autodelist.
If you're not sure what to edit, just upload your photos and Crosslist generates complete listings with AI, including titles, descriptions, condition, and competitive pricing.
The AI photo editor cleans up images and removes backgrounds in bulk, with unlimited removals on every plan.
And because Crosslist supports the US, UK, Canada, and Australia, you can expand into regional marketplace variants most competitors can't reliably handle.
Here's what sellers say:
“This is a game changer. Keeps all inventory in one place, easy to delist and relist. Not just for huge resellers, it has saved me so much time and increased my sales. It pays for itself many times over.”
— Lorraine F., Trustpilot
Relisting is just one way to keep your Mercari sales moving. Try Crosslist risk-free with our 3-day money-back guarantee.