

Ever noticed how e-commerce brands keep refreshing their products? Maybe it's the name, the description, a small design tweak, or the packaging.
Search engines favor fresh, relevant content, and a quick refresh also lets you fix any errors or inaccuracies that slipped through, so your products look better to customers.
Best of all, you get to revive those stale listings that aren't pulling any traffic.
Say you run a Shopify store selling handmade pottery and ceramics, but your items are barely getting any views or sales. Knowing how to relist on Shopify is one way to fix that.
A product relister for Shopify like Crosslist can refresh stale listings and bring traffic back to your store.
Before we get into it, though, here are some basic things to keep in mind.
Key takeaways
Relisting on Shopify is different from marketplaces, since Shopify relies on Google SEO, and deleting a product page can break backlinks and rankings.
Only relist when your listing is truly stale and has no traffic, no backlinks, and no SEO value. Otherwise, edit the existing listing instead.
With Crosslist, you can bulk relist your Shopify inventory when a full relist is needed, and use the update feature when you just need to change details without breaking your URLs.
Don’t forget Shopify URL redirects. If you do relist, set up a 301 redirect from the old product URL to the new one to preserve SEO value.
Pro tip: If you want to refresh your Shopify listings without losing your URLs, backlinks, or SEO rankings, use Crosslist’s update listing feature instead of a full relist.
What is Shopify relisting?
Relisting essentially means you’re replacing an old product listing with a newer, more updated one. You’ll be swapping out the old listing with a new listing for the same product.
Delisting (i.e. removing the existing product listing) and relisting it with a newer listing is a common practice carried out by sellers on online marketplaces.
It helps sellers boost their listings, bringing them to the top of search results.
But, as we know, Shopify is not your typical online marketplace. It doesn’t have a common website where you can go and search for the products you want.
Since it’s an e-commerce store builder, relisting on Shopify is a tad bit different than relisting on other marketplaces.
Let’s take a look at when you should relist on Shopify and when you should not!
When to relist on Shopify
If your products are barely getting any traffic
If you’ve made significant changes to your product and want your listings to reflect those changes
Your listings have turned stale and you want to get a boost in search rankings
You want to bump up certain seasonal items, such as winterwear when it’s starting to get cold outside, or Christmas decorations in November
When not to relist on Shopify
Unlike other online marketplaces, on Shopify, most of the traffic you get is due to Google’s SEO. Backlinks and other marketing may also play a role in it.
So, when you delete a product listing (first step of delist and relist) as opposed to archiving it from your Shopify store, it will affect your SEO rankings.
How? Because if someone clicks on a direct link to the product, they’ll be met with a 404 error page, which is neither good for your visibility, nor for your customer experience.
Keeping this in mind, it’s best to not relist on Shopify:
When you have a lot of traffic coming to that particular product page
When the product page has several backlinks, i.e. when there’s a potential for customers to land on that page through articles, emails, social media posts, etc.
When the product page is already part of some users’ experience
In these cases, it’s best to just edit the product pages with any new information.
Or, you can mark the product as unavailable, create a fresh listing with the new version of the product, and redirect to the new page.
If you'd rather do it natively in Shopify, you have a couple of options. To refresh a product without losing its URL, open it from your admin, edit the fields directly, and save.
To create a genuinely fresh listing, use Duplicate: open the product, click Duplicate, set the copy to Draft while you make your changes, then switch it to Active when you're ready.
If you delete the old product instead of archiving it, set up a 301 redirect from the old URL to the new one so shoppers and search engines land in the right place.
One thing to watch: Shopify ties each product to a URL handle.
So, if it tells you a product is already listed after a deletion, the old handle is still reserved and you'll need to free it or pick a new one.
Note: if you want to refresh your listings on Shopify without losing your URLs, backlinks, or SEO rankings, use Crosslist’s update listing feature instead.
Updating lets you change descriptions, photos, prices, and tags on the existing listing, without deleting it and creating a new one.
Your product URL stays the same, your Google rankings stay intact, and your customers don’t hit a 404 page.
Autodelist: what happens when an item sells?
One thing many relisting guides don’t talk about is what happens after an item sells on Shopify.
If you’re selling the same item across multiple marketplaces, a sale on one platform does not automatically remove it from the others.
Until you manually delist the item everywhere else, it can still be purchased by another buyer, without you noticing.
If it happens, you've double-sold. You’re forced to cancel an order, issue a refund, and potentially deal with negative feedback or marketplace penalties.
The more platforms you sell on, the easier it becomes to lose track of inventory manually.
This is why autodelist exists. Cross listing tools like Crosslist can detect when an item sells on any connected marketplace and automatically remove the listing from every other platform.
That means less manual checking, fewer mistakes, and a much lower risk of double-selling.
Note: for some marketplaces, this requires your desktop app or browser extension to be running in the background.
These solve two different problems: relisting refreshes stale inventory to boost visibility, and autodelist protects sold inventory from double-selling.
If you're selling on more than one marketplace, you need both.
How to relist on Shopify in bulk (with Crosslist)
Delisting and relisting a couple of products? Pretty easy to carry out manually.
But, what if you want to relist 10 of your stale Shopify listings at once? What about 50? Or even 100? Impossible to do manually.
What’s the solution, then? Do you need to build a custom tool from scratch? Nope, because we took care of that for you. All you need to do is use Crosslist! Here’s how.
Step 1: Import your existing Shopify inventory to Crosslist
This step is for those of you who aren’t a part of the Crosslist crew yet. If you already have a Crosslist subscription and have your Shopify inventory synced here, you can skip to the next step.
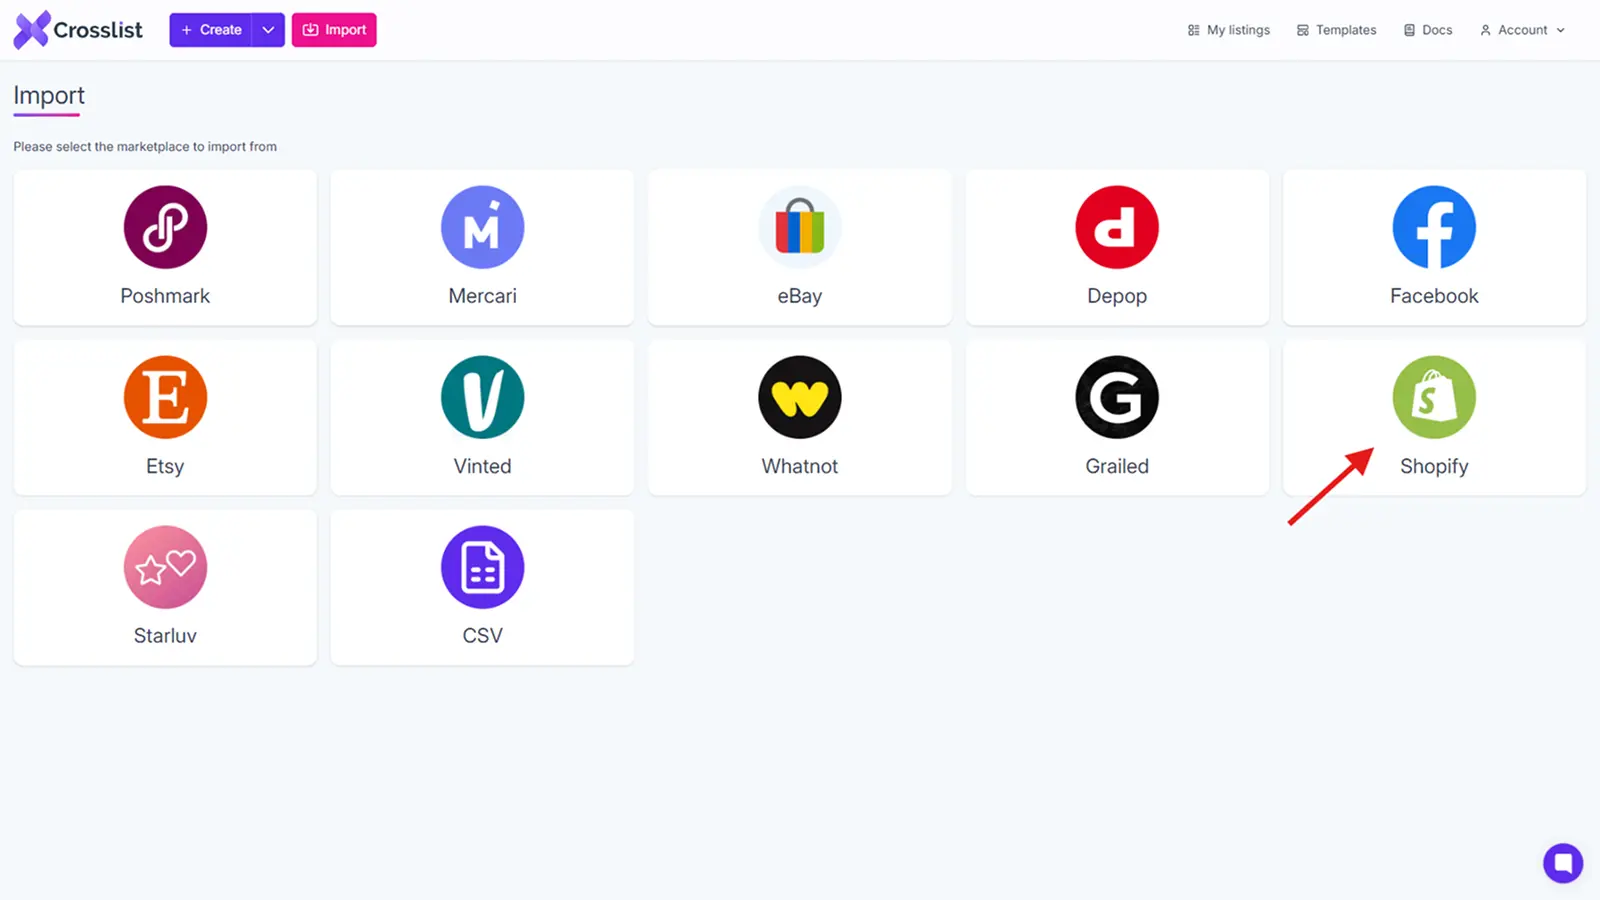
For the rest of you… Before Crosslist can relist your Shopify listings, you need to import your inventory to our tool. Open Crosslist and click on the Import button that you see at the top.

You’ll be met with a list of all the 11 marketplaces that Crosslist supports. Click the check mark next to Shopify to bring your inventory to Crosslist.
You’ll see a yellow sync text at the top indicating that the syncing is in progress. Depending on the number of products you have on Shopify, this may take up to a few minutes.
Once the syncing is complete, you can either:
Import your full Shopify inventory to Crosslist, (or)
Select only a few specific listings by using the advanced search bar
We recommend the first option as having everything on Crosslist will just make things easier for you in the future.
You can import your entire inventory in one go (even if you have 500 items), or do it in batches of 100.
Toggle the “Only show listings not yet imported” switch to make sure there aren’t any duplicates.
Once you’ve made your choice, select the Import button and wait till your Shopify listings come and land in your Crosslist dashboard.
Step 2: Navigate to your Crosslist listing overview
Also known as the dashboard, this is where Crosslist gives you a glance of all of your listings.
If you’ve already been using Crosslist to create and post your products on multiple marketplaces, you’ll see those listings here, too.

But, right now, you only want your Shopify listings. So, what you need to do now is to use the Origin or Listed On tabs near the search bar to filter your listings.
Tweak them to display only those listings that you’ve posted on Shopify.
Before moving on to the next step, you can make tweaks to your product listings if you’d like.
For instance, maybe you want to change the product description or tags, post a listing video, or even change the price of an item.
💡 Expert tips:
If you want to mark-up or mark-down the prices for all of your Shopify listings before you relist them, you can do it in bulk through Crosslist. Go to Account Settings → Price Markups. Set a mark-up or mark-down number or percentage and click on Save.
Instead of editing your Shopify listings one by one, you can edit them in bulk by creating a listing template and applying the template to all of your listings in bulk. Make sure to only include the changes in the listing templates. For a more detailed guide, check out this page on editing listings in bulk on Crosslist.
Step 3: Select all the listings you want to relist to Shopify
Now, select all the listings that you want to relist from the overview page.
If you want to do it for all of your existing Shopify listings, just check the box at the very top to select all of them in one go.
(Yes, Crosslist does bulk delist and relist your listings, so you’ll save a ton of time!)
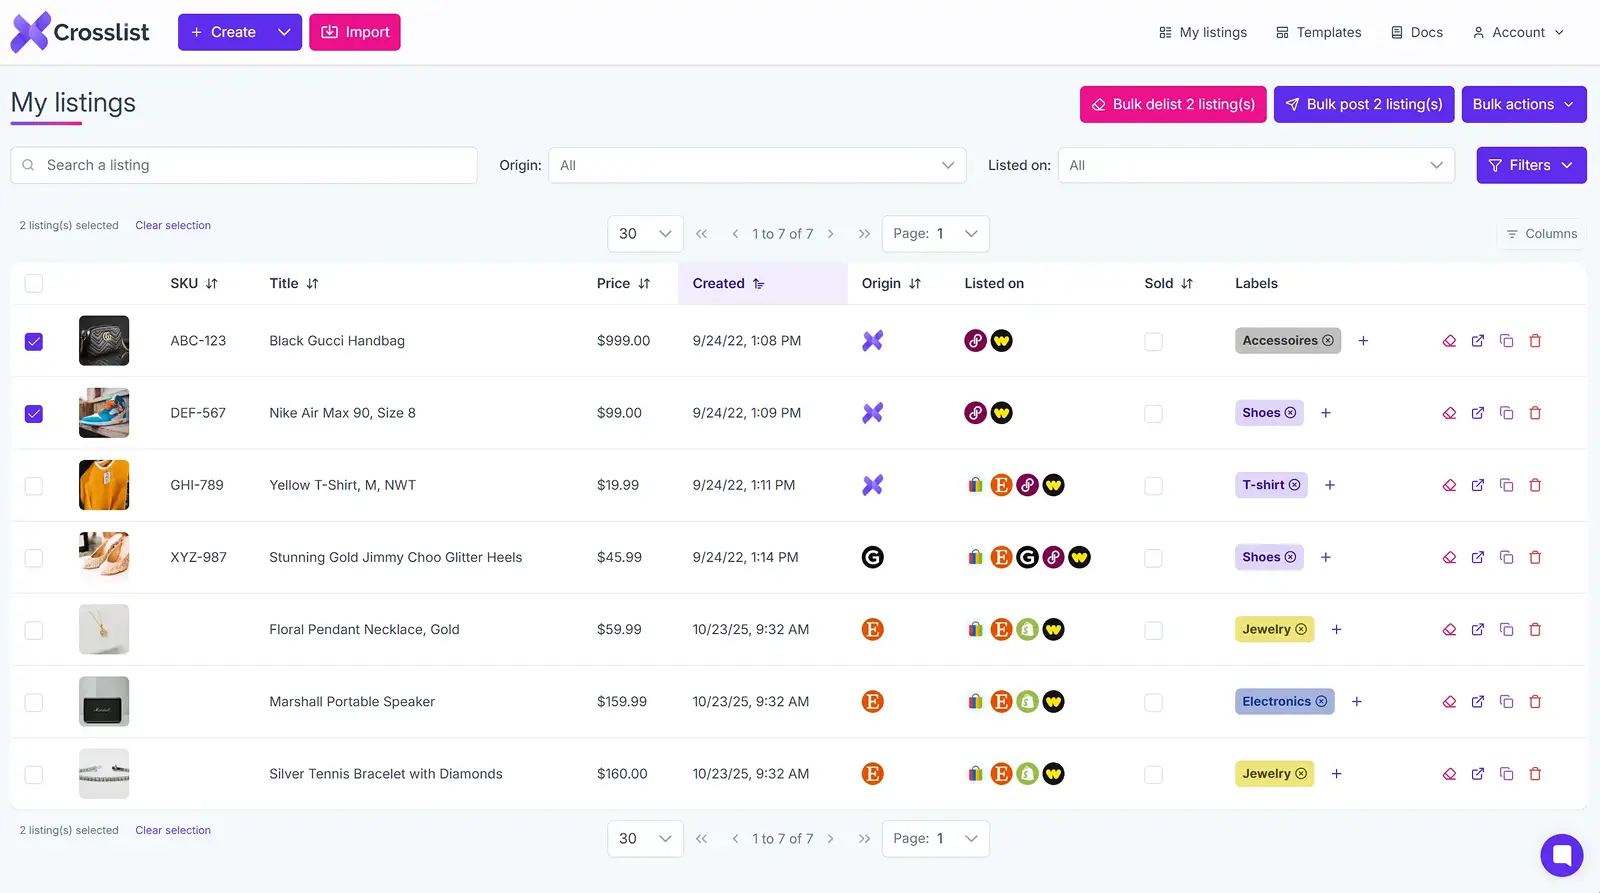
Once selected, click on the Bulk post (x) listings button at the top right corner of the screen.
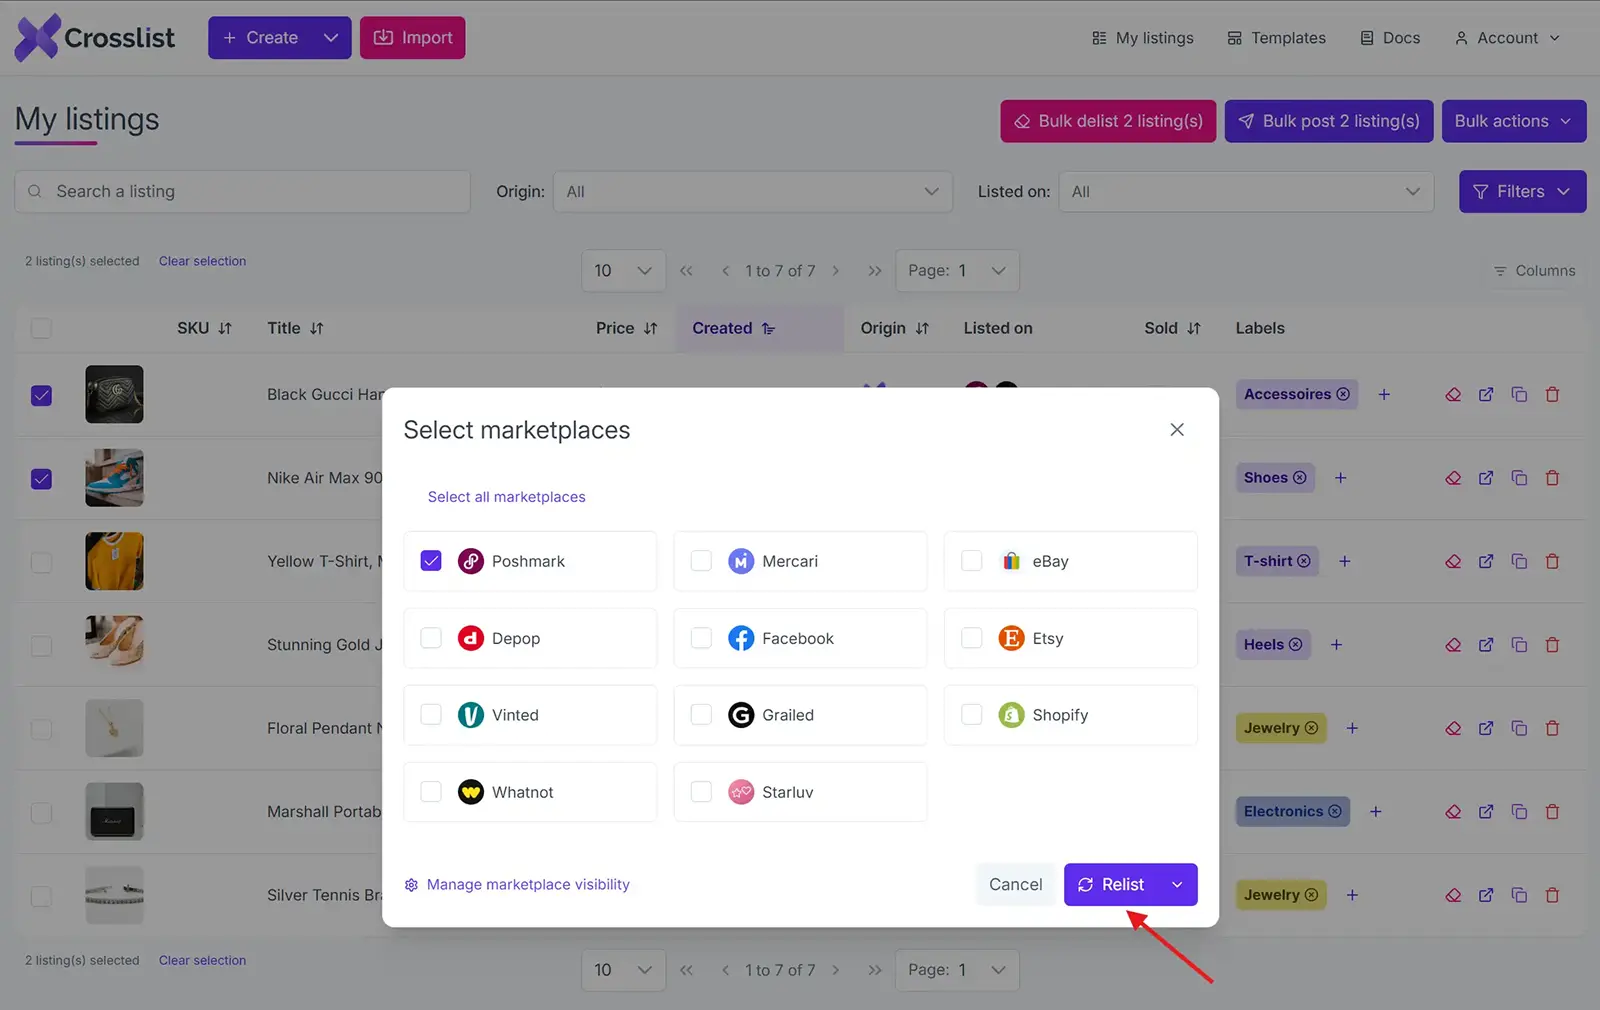
A pop-up with all of the 11 marketplaces that Crosslist supports will appear on your screen.
Check the box next to Shopify since that’s the platform we’re going to relist on.
Step 4: Click the “Relist” button
Click on the Relist button at the bottom of the pop-up screen. And you’re done!
Crosslist will take care of removing the older listing and creating a fresh new listing in its place.
Crosslist will now automatically relist all listings on Shopify. No manual intervention or monitoring required from you.
Relisting a single listing on Shopify
If you only want to relist a single listing, you can use the above method, too.
But, if you feel like you’d just feel better if you personally checked on the listing and made a few manual edits before relisting, you can follow this process:
From the listing overview, click on the listing you want to relist.
Make sure all the details are accurate. Edit the fields you want to edit.
On the left corner of the screen, you’ll see a list of all the 11 marketplaces that Crosslist supports. Check the box next to Shopify since that’s where your product will be relisted.
Scroll down and click on the Relist button.
Voila! You’re done!
📋 Note: You don’t have to delist your products before you go on to relist them. Just click on the relist button and Crosslist will automatically delist it for you before replacing it with a fresh listing.
What else can you do with Crosslist?
Is Crosslist only good for delisting and relisting? Not at all! You can do a ton of other things with Crosslist for Shopify.
Create new Shopify listings within Crosslist and post them directly to Shopify. Our tool will automatically display all the fields needed for a listing on Shopify. If you’re a multichannel seller, you can create a single listing and post it simultaneously to all of the marketplaces you sell on.
Cross list directly from Shopify to another marketplace (or vice versa). Let’s say you have a Shopify store, but are planning to expand to Etsy and Poshmark as well. Instead of manually creating new listings on Poshmark, just select your Shopify listings and cross list them to Poshmark. You’ll be all done and ready to start selling within minutes.
Create AI-generated product listings — complete with title, description, tags, conditions, and colors. Just upload your product photos, and Crosslist will take care of the rest.
Not sure how to price your items? Crosslist’s AI tool will give you competitive pricing suggestions based on internet trends. This will save you a lot of time on market research.
Set up default shipping profiles for each of the marketplaces you sell on. Let’s say you set up USPS as your shipping option for Shopify. Every time you create a new listing, this shipping option will automatically be added to your listing.
An AI image editor and bulk background remover tool. Crosslist also automatically resizes your images to fit platform size requirements without cutting off any part of your photos.
Shopify relisting tool: why Crosslist?
Crosslist is more than a Shopify relisting tool. It handles the repetitive work of relisting in bulk so you can focus on sourcing and selling, and it does a lot more once you're set up.
Fill out one dynamic form and post to every major marketplace at once. No separate form per platform, the way most cross listing apps still make you do it.
On the go? You can relist, edit, and manage your inventory straight from your phone with the mobile app.
When an item sells on any connected marketplace, Crosslist detects the sale and removes the listing everywhere else with autodelist.
Don't feel like rewriting descriptions during a relist?
Upload your photos and Crosslist generates complete listings with AI, including titles, descriptions, condition, and competitive pricing.
The AI photo editor cleans up images and removes backgrounds in bulk, with unlimited removals on every plan.
And because Crosslist supports the US, UK, Canada, and Australia, you can expand into regional marketplace variants most competitors can't reliably handle.
Here's what sellers say:
“This is a game changer. Keeps all inventory in one place, easy to delist and relist. Not just for huge resellers, it has saved me so much time and increased my sales. It pays for itself many times over.”
— Lorraine F., Trustpilot
Relisting is just one way to keep your Shopify sales moving. Try Crosslist risk-free with our 3-day money-back guarantee.
Ever noticed how e-commerce brands keep refreshing their products? Maybe it's the name, the description, a small design tweak, or the packaging.
Search engines favor fresh, relevant content, and a quick refresh also lets you fix any errors or inaccuracies that slipped through, so your products look better to customers.
Best of all, you get to revive those stale listings that aren't pulling any traffic.
Say you run a Shopify store selling handmade pottery and ceramics, but your items are barely getting any views or sales. Knowing how to relist on Shopify is one way to fix that.
A product relister for Shopify like Crosslist can refresh stale listings and bring traffic back to your store.
Before we get into it, though, here are some basic things to keep in mind.
Key takeaways
Relisting on Shopify is different from marketplaces, since Shopify relies on Google SEO, and deleting a product page can break backlinks and rankings.
Only relist when your listing is truly stale and has no traffic, no backlinks, and no SEO value. Otherwise, edit the existing listing instead.
With Crosslist, you can bulk relist your Shopify inventory when a full relist is needed, and use the update feature when you just need to change details without breaking your URLs.
Don’t forget Shopify URL redirects. If you do relist, set up a 301 redirect from the old product URL to the new one to preserve SEO value.
Pro tip: If you want to refresh your Shopify listings without losing your URLs, backlinks, or SEO rankings, use Crosslist’s update listing feature instead of a full relist.
What is Shopify relisting?
Relisting essentially means you’re replacing an old product listing with a newer, more updated one. You’ll be swapping out the old listing with a new listing for the same product.
Delisting (i.e. removing the existing product listing) and relisting it with a newer listing is a common practice carried out by sellers on online marketplaces.
It helps sellers boost their listings, bringing them to the top of search results.
But, as we know, Shopify is not your typical online marketplace. It doesn’t have a common website where you can go and search for the products you want.
Since it’s an e-commerce store builder, relisting on Shopify is a tad bit different than relisting on other marketplaces.
Let’s take a look at when you should relist on Shopify and when you should not!
When to relist on Shopify
If your products are barely getting any traffic
If you’ve made significant changes to your product and want your listings to reflect those changes
Your listings have turned stale and you want to get a boost in search rankings
You want to bump up certain seasonal items, such as winterwear when it’s starting to get cold outside, or Christmas decorations in November
When not to relist on Shopify
Unlike other online marketplaces, on Shopify, most of the traffic you get is due to Google’s SEO. Backlinks and other marketing may also play a role in it.
So, when you delete a product listing (first step of delist and relist) as opposed to archiving it from your Shopify store, it will affect your SEO rankings.
How? Because if someone clicks on a direct link to the product, they’ll be met with a 404 error page, which is neither good for your visibility, nor for your customer experience.
Keeping this in mind, it’s best to not relist on Shopify:
When you have a lot of traffic coming to that particular product page
When the product page has several backlinks, i.e. when there’s a potential for customers to land on that page through articles, emails, social media posts, etc.
When the product page is already part of some users’ experience
In these cases, it’s best to just edit the product pages with any new information.
Or, you can mark the product as unavailable, create a fresh listing with the new version of the product, and redirect to the new page.
If you'd rather do it natively in Shopify, you have a couple of options. To refresh a product without losing its URL, open it from your admin, edit the fields directly, and save.
To create a genuinely fresh listing, use Duplicate: open the product, click Duplicate, set the copy to Draft while you make your changes, then switch it to Active when you're ready.
If you delete the old product instead of archiving it, set up a 301 redirect from the old URL to the new one so shoppers and search engines land in the right place.
One thing to watch: Shopify ties each product to a URL handle.
So, if it tells you a product is already listed after a deletion, the old handle is still reserved and you'll need to free it or pick a new one.
Note: if you want to refresh your listings on Shopify without losing your URLs, backlinks, or SEO rankings, use Crosslist’s update listing feature instead.
Updating lets you change descriptions, photos, prices, and tags on the existing listing, without deleting it and creating a new one.
Your product URL stays the same, your Google rankings stay intact, and your customers don’t hit a 404 page.
Autodelist: what happens when an item sells?
One thing many relisting guides don’t talk about is what happens after an item sells on Shopify.
If you’re selling the same item across multiple marketplaces, a sale on one platform does not automatically remove it from the others.
Until you manually delist the item everywhere else, it can still be purchased by another buyer, without you noticing.
If it happens, you've double-sold. You’re forced to cancel an order, issue a refund, and potentially deal with negative feedback or marketplace penalties.
The more platforms you sell on, the easier it becomes to lose track of inventory manually.
This is why autodelist exists. Cross listing tools like Crosslist can detect when an item sells on any connected marketplace and automatically remove the listing from every other platform.
That means less manual checking, fewer mistakes, and a much lower risk of double-selling.
Note: for some marketplaces, this requires your desktop app or browser extension to be running in the background.
These solve two different problems: relisting refreshes stale inventory to boost visibility, and autodelist protects sold inventory from double-selling.
If you're selling on more than one marketplace, you need both.
How to relist on Shopify in bulk (with Crosslist)
Delisting and relisting a couple of products? Pretty easy to carry out manually.
But, what if you want to relist 10 of your stale Shopify listings at once? What about 50? Or even 100? Impossible to do manually.
What’s the solution, then? Do you need to build a custom tool from scratch? Nope, because we took care of that for you. All you need to do is use Crosslist! Here’s how.
Step 1: Import your existing Shopify inventory to Crosslist
This step is for those of you who aren’t a part of the Crosslist crew yet. If you already have a Crosslist subscription and have your Shopify inventory synced here, you can skip to the next step.
For the rest of you… Before Crosslist can relist your Shopify listings, you need to import your inventory to our tool. Open Crosslist and click on the Import button that you see at the top.
You’ll be met with a list of all the 11 marketplaces that Crosslist supports. Click the check mark next to Shopify to bring your inventory to Crosslist.
You’ll see a yellow sync text at the top indicating that the syncing is in progress. Depending on the number of products you have on Shopify, this may take up to a few minutes.
Once the syncing is complete, you can either:
Import your full Shopify inventory to Crosslist, (or)
Select only a few specific listings by using the advanced search bar
We recommend the first option as having everything on Crosslist will just make things easier for you in the future.
You can import your entire inventory in one go (even if you have 500 items), or do it in batches of 100.
Toggle the “Only show listings not yet imported” switch to make sure there aren’t any duplicates.
Once you’ve made your choice, select the Import button and wait till your Shopify listings come and land in your Crosslist dashboard.
Step 2: Navigate to your Crosslist listing overview
Also known as the dashboard, this is where Crosslist gives you a glance of all of your listings.
If you’ve already been using Crosslist to create and post your products on multiple marketplaces, you’ll see those listings here, too.
But, right now, you only want your Shopify listings. So, what you need to do now is to use the Origin or Listed On tabs near the search bar to filter your listings.
Tweak them to display only those listings that you’ve posted on Shopify.
Before moving on to the next step, you can make tweaks to your product listings if you’d like.
For instance, maybe you want to change the product description or tags, post a listing video, or even change the price of an item.
💡 Expert tips:
If you want to mark-up or mark-down the prices for all of your Shopify listings before you relist them, you can do it in bulk through Crosslist. Go to Account Settings → Price Markups. Set a mark-up or mark-down number or percentage and click on Save.
Instead of editing your Shopify listings one by one, you can edit them in bulk by creating a listing template and applying the template to all of your listings in bulk. Make sure to only include the changes in the listing templates. For a more detailed guide, check out this page on editing listings in bulk on Crosslist.
Step 3: Select all the listings you want to relist to Shopify
Now, select all the listings that you want to relist from the overview page.
If you want to do it for all of your existing Shopify listings, just check the box at the very top to select all of them in one go.
(Yes, Crosslist does bulk delist and relist your listings, so you’ll save a ton of time!)
Once selected, click on the Bulk post (x) listings button at the top right corner of the screen.
A pop-up with all of the 11 marketplaces that Crosslist supports will appear on your screen.
Check the box next to Shopify since that’s the platform we’re going to relist on.
Step 4: Click the “Relist” button
Click on the Relist button at the bottom of the pop-up screen. And you’re done!
Crosslist will take care of removing the older listing and creating a fresh new listing in its place.
Crosslist will now automatically relist all listings on Shopify. No manual intervention or monitoring required from you.
Relisting a single listing on Shopify
If you only want to relist a single listing, you can use the above method, too.
But, if you feel like you’d just feel better if you personally checked on the listing and made a few manual edits before relisting, you can follow this process:
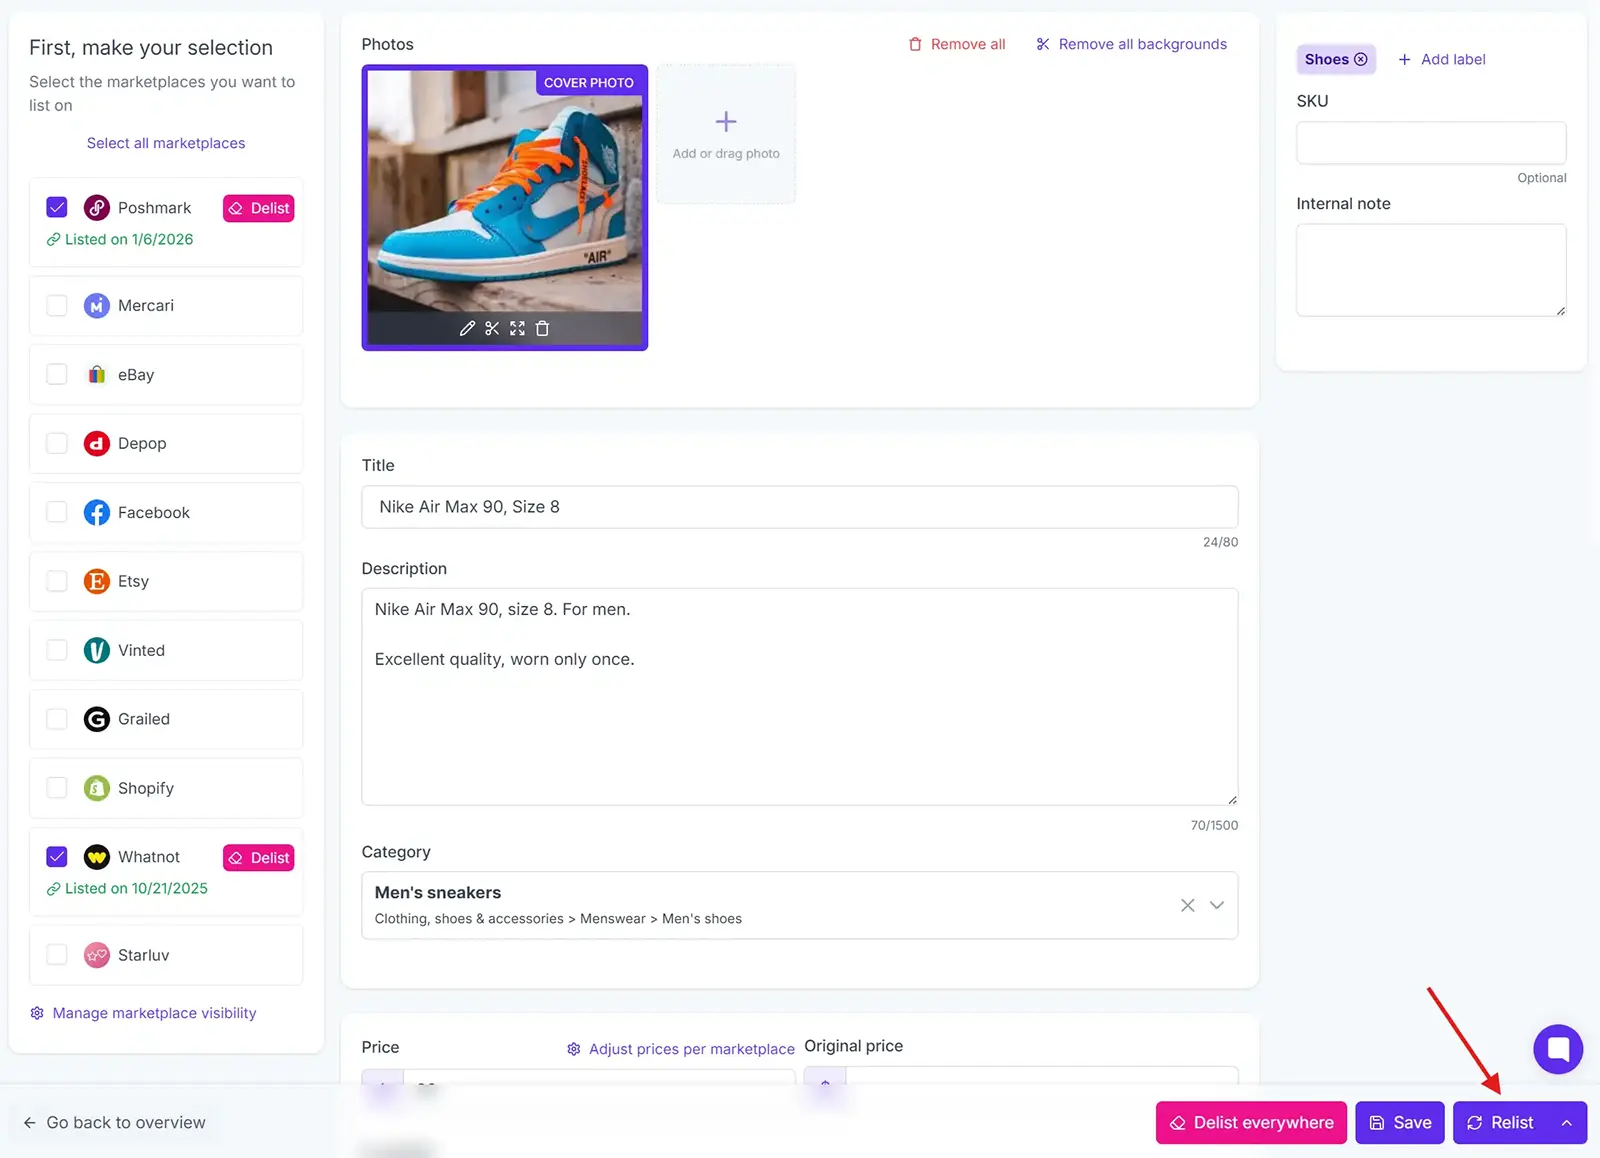
From the listing overview, click on the listing you want to relist.
Make sure all the details are accurate. Edit the fields you want to edit.
On the left corner of the screen, you’ll see a list of all the 11 marketplaces that Crosslist supports. Check the box next to Shopify since that’s where your product will be relisted.
Scroll down and click on the Relist button.
Voila! You’re done!
📋 Note: You don’t have to delist your products before you go on to relist them. Just click on the relist button and Crosslist will automatically delist it for you before replacing it with a fresh listing.
What else can you do with Crosslist?
Is Crosslist only good for delisting and relisting? Not at all! You can do a ton of other things with Crosslist for Shopify.
Create new Shopify listings within Crosslist and post them directly to Shopify. Our tool will automatically display all the fields needed for a listing on Shopify. If you’re a multichannel seller, you can create a single listing and post it simultaneously to all of the marketplaces you sell on.
Cross list directly from Shopify to another marketplace (or vice versa). Let’s say you have a Shopify store, but are planning to expand to Etsy and Poshmark as well. Instead of manually creating new listings on Poshmark, just select your Shopify listings and cross list them to Poshmark. You’ll be all done and ready to start selling within minutes.
Create AI-generated product listings — complete with title, description, tags, conditions, and colors. Just upload your product photos, and Crosslist will take care of the rest.
Not sure how to price your items? Crosslist’s AI tool will give you competitive pricing suggestions based on internet trends. This will save you a lot of time on market research.
Set up default shipping profiles for each of the marketplaces you sell on. Let’s say you set up USPS as your shipping option for Shopify. Every time you create a new listing, this shipping option will automatically be added to your listing.
An AI image editor and bulk background remover tool. Crosslist also automatically resizes your images to fit platform size requirements without cutting off any part of your photos.
Shopify relisting tool: why Crosslist?
Crosslist is more than a Shopify relisting tool. It handles the repetitive work of relisting in bulk so you can focus on sourcing and selling, and it does a lot more once you're set up.
Fill out one dynamic form and post to every major marketplace at once. No separate form per platform, the way most cross listing apps still make you do it.
On the go? You can relist, edit, and manage your inventory straight from your phone with the mobile app.
When an item sells on any connected marketplace, Crosslist detects the sale and removes the listing everywhere else with autodelist.
Don't feel like rewriting descriptions during a relist?
Upload your photos and Crosslist generates complete listings with AI, including titles, descriptions, condition, and competitive pricing.
The AI photo editor cleans up images and removes backgrounds in bulk, with unlimited removals on every plan.
And because Crosslist supports the US, UK, Canada, and Australia, you can expand into regional marketplace variants most competitors can't reliably handle.
Here's what sellers say:
“This is a game changer. Keeps all inventory in one place, easy to delist and relist. Not just for huge resellers, it has saved me so much time and increased my sales. It pays for itself many times over.”
— Lorraine F., Trustpilot
Relisting is just one way to keep your Shopify sales moving. Try Crosslist risk-free with our 3-day money-back guarantee.