


If your Vinted sales have started to slow down, it may be time to refresh some of your older listings.
And the best way to do this without spending a ton of money on marketing is by relisting your old listings that have gone stale and unnoticed.
Not only will relisting help your items get more visibility, it also opens the door for more sales.
Here’s an in-depth guide on the benefits of relisting, and how you can relist on Vinted with a cross listing tool like Crosslist.
Key takeaways
Relisting on Vinted replaces stale listings with fresh ones, boosting visibility in search results, the main feed, and follower notifications
Be careful: Vinted’s terms explicitly prohibit relisting the same item multiple times. Limit yourself to 2–3 relists per item per year to avoid account suspension
Good news: relisting on Vinted is completely free, no listing fees unlike Etsy ($0.20) or eBay ($0.35)
With Crosslist, you can bulk relist your entire Vinted inventory in minutes, which works for both UK and US Vinted sellers
Benefits of relisting on Vinted
Before we dive in, here’s a quick definition of relisting. Relisting is the process of deleting your old listing and replacing it with a fresher, identical (or updated) listing.
You’re essentially dusting off the cobwebs from your old and forgotten listings and placing a fresher version of them at the front to give them a boost in their visibility.
Here are the main benefits of relisting on Vinted:
Good for SEO: The Vinted algorithm prioritizes newer listings and shows them on the main feed. This helps the platform keep the inventory fresh and entices shoppers to check out Vinted every day. When you relist something, it’s considered to be a new listing, which means it’ll show up on the main feed and at the top of search results.
Enhanced visibility: Whenever someone filters by “newest listings first,” your relisted items will show up there. Any shoppers who have followed you on Vinted will also get a notification about the new listings.
More sales: More eyeballs on your listings translates to more sales.
After a while, as newer listings from other sellers pop up, people are going to stop seeing or interacting with your old listings. Relisting solves this problem.
In short, relisting on Vinted gives your stale listings a new lease on life.
When should you relist on Vinted?
When it comes to relisting on Vinted, moderation is key. You need to allow enough time to pass from when you originally posted the listing.
We generally recommend that you wait at least 60 days before you relist.
Apart from this, it’s a good idea to relist when:
Your old listings have gone stale, i.e. the items have remained unsold for months
The number of views and interactions with your listings have trickled down to zero
You have multiple variants of the same product, but a few variants haven’t sold even a single item
You want to make changes to your listings — either because you feel it could do with a boost, or because you’ve made minor changes to the products you’re selling
You’re selling seasonal items and want to give them a bump when the seasonal shoppers start coming in
Additionally, if a buyer returns your item after it was already sold, Vinted requires you to upload a new listing for it.
How often should you relist on Vinted?
You must be careful to not delist (i.e. delete) and relist the same item too often as that goes against Vinted’s terms and conditions.
If Vinted catches you doing so, your account may be suspended or permanently blocked.
Based on our experience, our recommendation for the frequency of relisting is to not relist the same product more than once per week.
Besides violating Vinted’s terms, it’s bad for your business as well.
Think about it this way. If shoppers open Vinted only to see you relisting the same products again and again, they’re going to lose interest.
Eventually, they will stop checking out your store, because they will assume that you have no new listings, as per usual.
Moreover, if you relist the same item two or more times and still don't get any interest, then your problem likely isn’t visibility.
It could be something to do with the product itself, or the listing might need a different Vinted selling approach.
To make sure that you don’t end up accidentally relisting the same products twice, have a tracking system where you can keep note of the ones that have been relisted.
Separate your items into batches or categories (i.e. clothes, shoes, etc.) and relist a single batch at a time.
Autodelist: what happens when an item sells?
One thing many relisting guides don’t talk about is what happens after an item sells on Vinted.
If you’re selling the same item across multiple marketplaces, a sale on one platform does not automatically remove it from the others.
Until you manually delist the item everywhere else, it can still be purchased by another buyer, without you noticing.
If it happens, you've double-sold. You’re forced to cancel an order, issue a refund, and potentially deal with negative feedback or marketplace penalties.
The more platforms you sell on, the easier it becomes to lose track of inventory manually.
This is why autodelist exists.
Cross listing tools like Crosslist can detect when an item sells on any connected marketplace and automatically remove the listing from every other platform.
That means less manual checking, fewer mistakes, and a much lower risk of double-selling.
Note: for some marketplaces, this requires your desktop app or browser extension to be running in the background.
These solve two different problems: relisting refreshes stale inventory to boost visibility, and autodelist protects sold inventory from double-selling.
If you're selling on more than one marketplace, you need both.
How to relist on Vinted in bulk (with Crosslist)
Normally, your relisting process would go something like this: you go to Vinted to locate the listing you want to relist, copy all the listing details on a notes app, delete the listing, create a fresh listing, copy all the details back up again, and post.
Vinted doesn't have a one-tap relist button, so this delete-and-repost routine is the only native way to do it.
It also helps to change something meaningful when you repost, like the cover photo or the title, so the algorithm treats it as a genuinely new listing rather than a duplicate.
While this process is fine for a single listing or two, it’s not really feasible for when you want to relist your items in bulk.
And, unless you only sell a handful of items, you probably will be relisting in bulk.
Relisting in bulk manually will eat up hours of your time and energy, and is prone to errors.
This is exactly where a product relister for Vinted like Crosslist earns its keep, turning that whole delete-and-repost routine into a couple of clicks.
Relisting manually | Relisting with a tool like Crosslist |
Very time-consuming; will take hours | Quick and easy; will be done in a few minutes |
Sucks up your energy and brainpower | Only needs the click of a few buttons, freeing up your energy to focus on more important things |
Prone to errors | Error-free |
One thing to know before you start: you have to delist your existing listings before you can relist them. Skip it, and Vinted may flag you for duplicate listings and remove your products.
Deleting each one by hand time-consuming part, but don't worry, because Crosslist automatically deletes a listing before replacing it with the new one.
Here's how relisting with Crosslist works.
Step 1: Import your existing Vinted inventory to Crosslist
Since the whole relisting process happens inside Crosslist, you need to have a subscription (naturally). So, if you aren’t already a Crosslist user, sign up here.
We have affordable monthly plans and offer a 3-day money-back guarantee (as long as you’ve created 20 or fewer listings).
The next order of business is to import your existing Vinted inventory to Crosslist. If your Vinted listings are already within the tool, you can skip ahead to step 2.
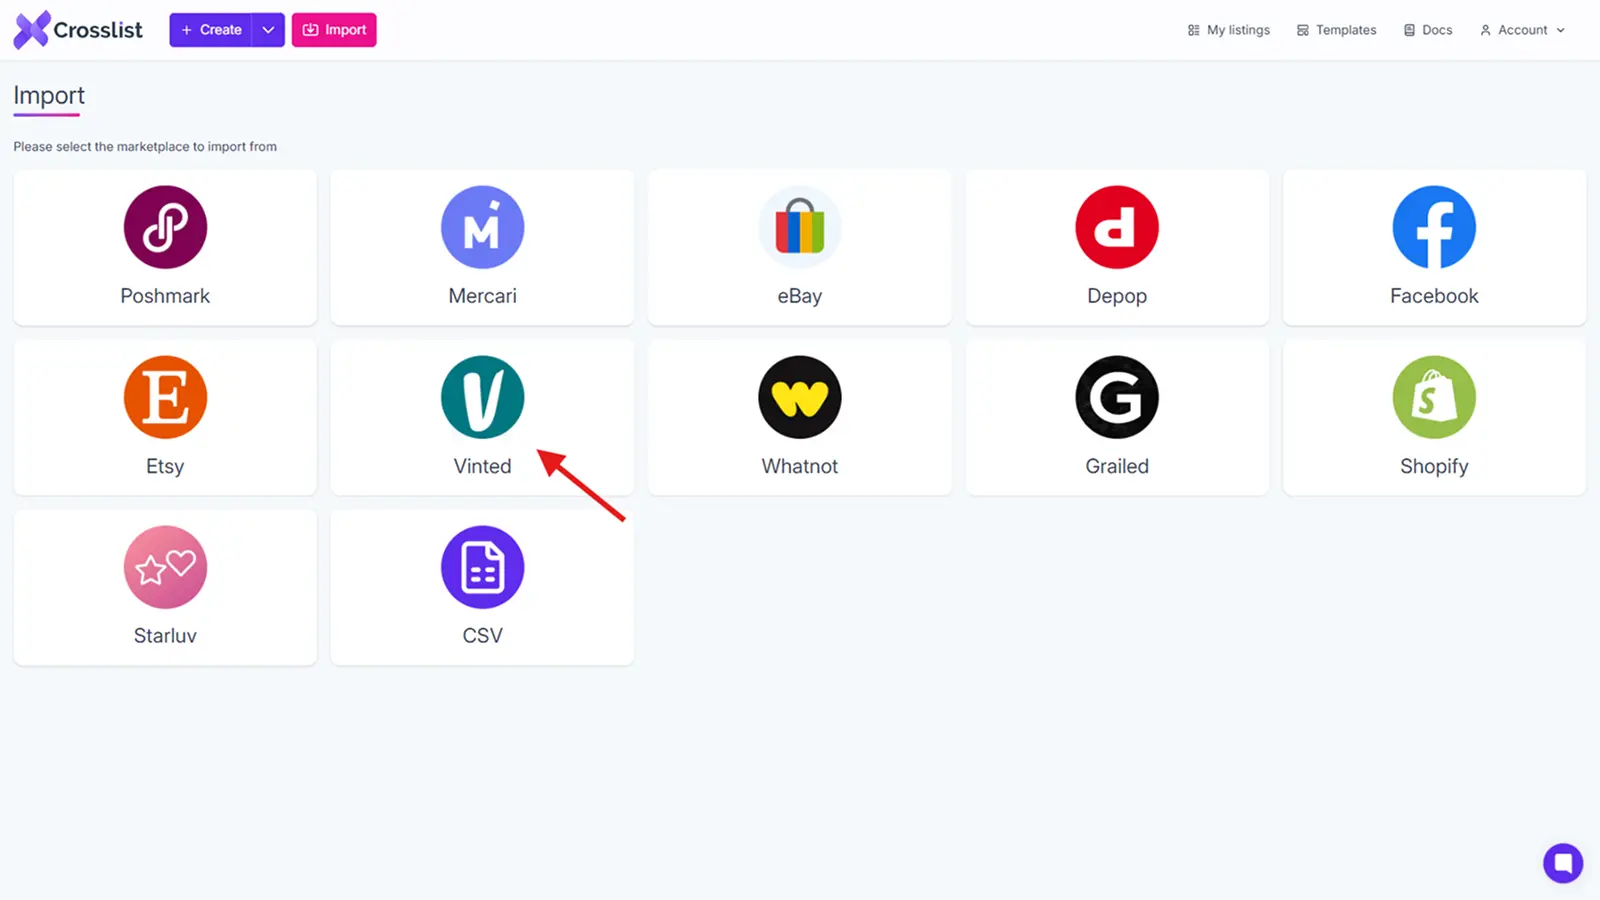
The rest of you: log in and head to your Crosslist dashboard. You’ll see an Import button at the top left corner of the screen.

Click on it, and you’ll see a pop-up (with a list of all the 11 marketplaces that Crosslist supports) open up on the screen.
Since we’re going to be bringing in your Vinted listings, select Vinted from the pop-up.
Crosslist will immediately start syncing your listings, preparing them to be imported. This is indicated by a yellow sync button.
This may take a few minutes, especially if you have a large inventory.
Once the sync process is over, your Vinted listings are ready to be imported to Crosslist. You can do this in one of two different ways:
Import your full Vinted inventory to Crosslist at once — regardless of how many listings you currently have
Import only specific listings (in batches of up to 100 listings each)
If you have a big inventory and are planning on relisting them all at some point, the first option would be your best option.
This way, you won’t have to keep repeating the process of importing your listings every time you want to relist.
Crosslist can also import your entire inventory at once (whether you have 25 listings or 250), so you don’t have any restrictions on the number of listings you can bring in.
It also helps to have your inventory in one place in case you want to cross list your listings to other marketplaces.
On the other hand, if there are a few items that you never plan on selling again, or if you only want to relist seasonal items, the second option might be easier.
For example, you only want to relist your Christmas-themed items, and don’t want to go through the hassle of searching for them from among your full inventory.
In this case, you can use Crosslist’s advanced search function to look up and select the listings you want to bring in.
If you're doing it in batches, you can toggle the Only show the listings not yet imported button to prevent yourself from accidentally importing the same listings twice.
After you’ve selected all the listings and are ready to import them, click on the Import button and wait for Crosslist to bring everything in.
Step 2: Navigate to the listing overview on Crosslist
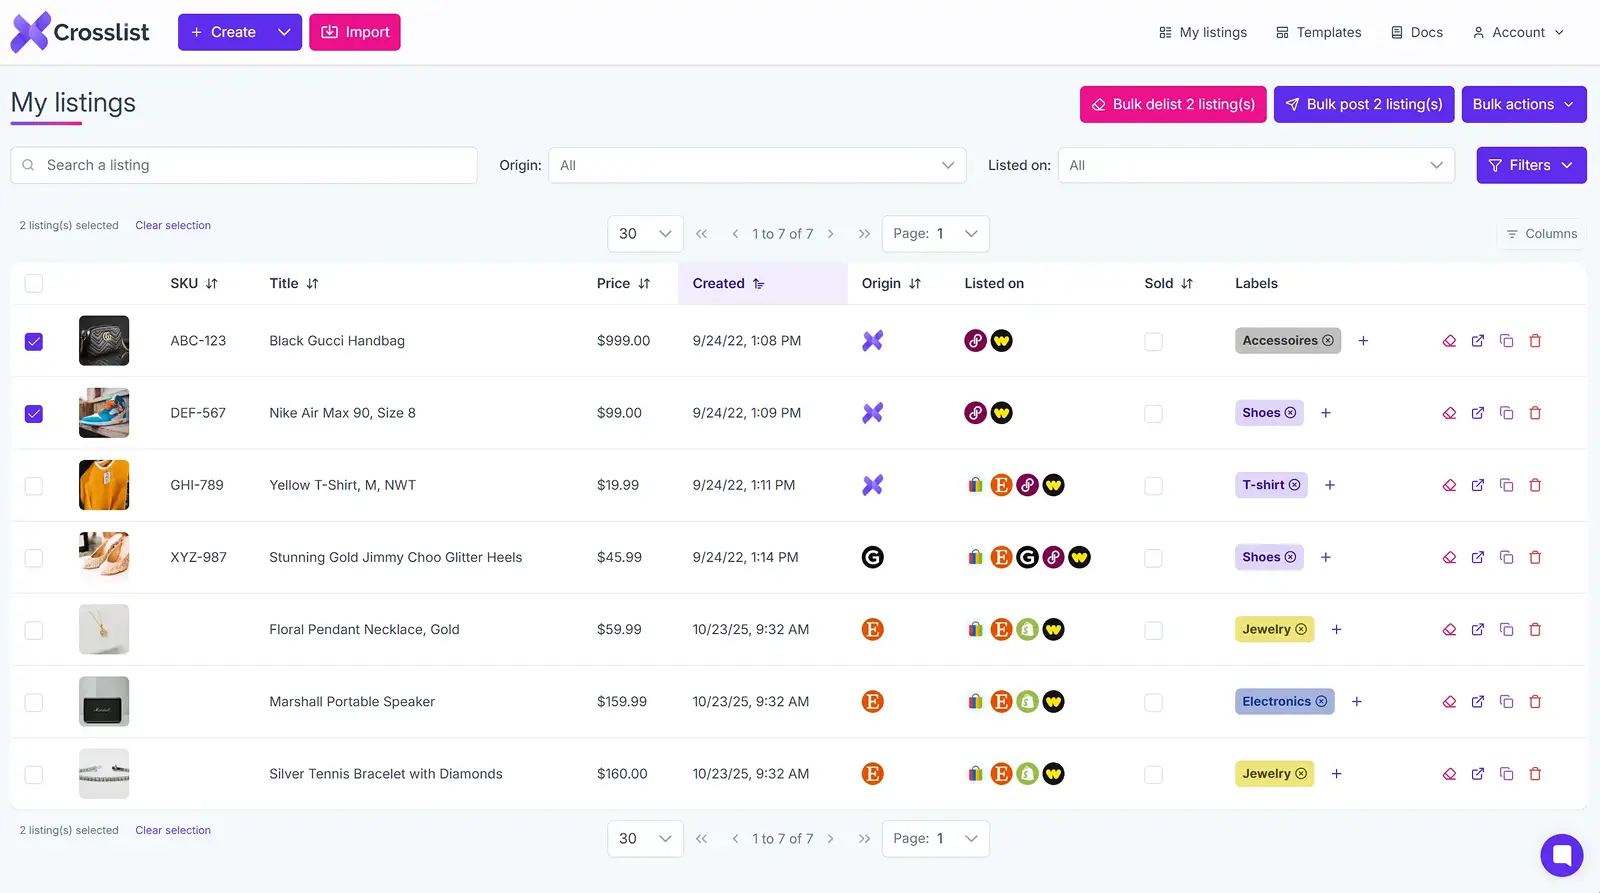
The listing overview, also known as your dashboard, is where you’ll be able to see all of your listings at a glance.
(Note that you’ll only be able to see listings that were created in Crosslist, or were imported to Crosslist.)
Once Crosslist has brought all of your listings in, you can view them here.
Here’s what the dashboard will show you about your listings:
Title
Cover image
SKU (if one is available)
Creation date
Origin of the listing (whether it was created within Crosslist, or was imported from outside)
All the marketplaces the listing has been cross listed to
Listing labels (such as “shoes” for all listings of shoes)

To relist on Vinted, it’ll be easier if you could only view the listings that have been imported from (or) listed on Vinted.
If you just imported your Vinted listings through step 1, use the Origin tab to only show listings that were imported from Vinted.
If you were already a Crosslist user, you can filter the Listed on section to only show the listings that have been posted to Vinted.
💡 Want to update your listings with some fresh information or new product photos? Now is your chance.
Maybe you want to update your product prices, or add video listings to better highlight the benefits of your items.
Either way, click on the listing(s) you want to make edits to, and go ahead on making the changes!
Expert tips:
Whether you want to mark down the prices of your listings in bulk to get more sales, or want to mark them up to better reflect the current market, Crosslist lets you carry out this step in bulk. Go to Account Settings → Price Markup and enter a percentage or number on the field next to Vinted. This will make the price change across all of your listings. (Note: Enter a negative number or percentage to mark down your prices.)
If you want to make similar kinds of edits to several listings at once, you can use Crosslist’s templates. Create a template with the edit you want to make and apply the template to all of the relevant listings at once. Here’s a guide on editing listings in bulk with Crosslist.
Step 3: Select the listings you want to relist on Vinted
From your listing overview, select all the listings you want to renew.
If your plan is to relist your entire inventory at once, just select all by clicking the box at the top of the very first listing.
If you’re worried about relisting restrictions, you don’t have to be. Crosslist can delist and relist your entire inventory at once. In bulk.
Without making your Vinted account look like it was taken over by bots.
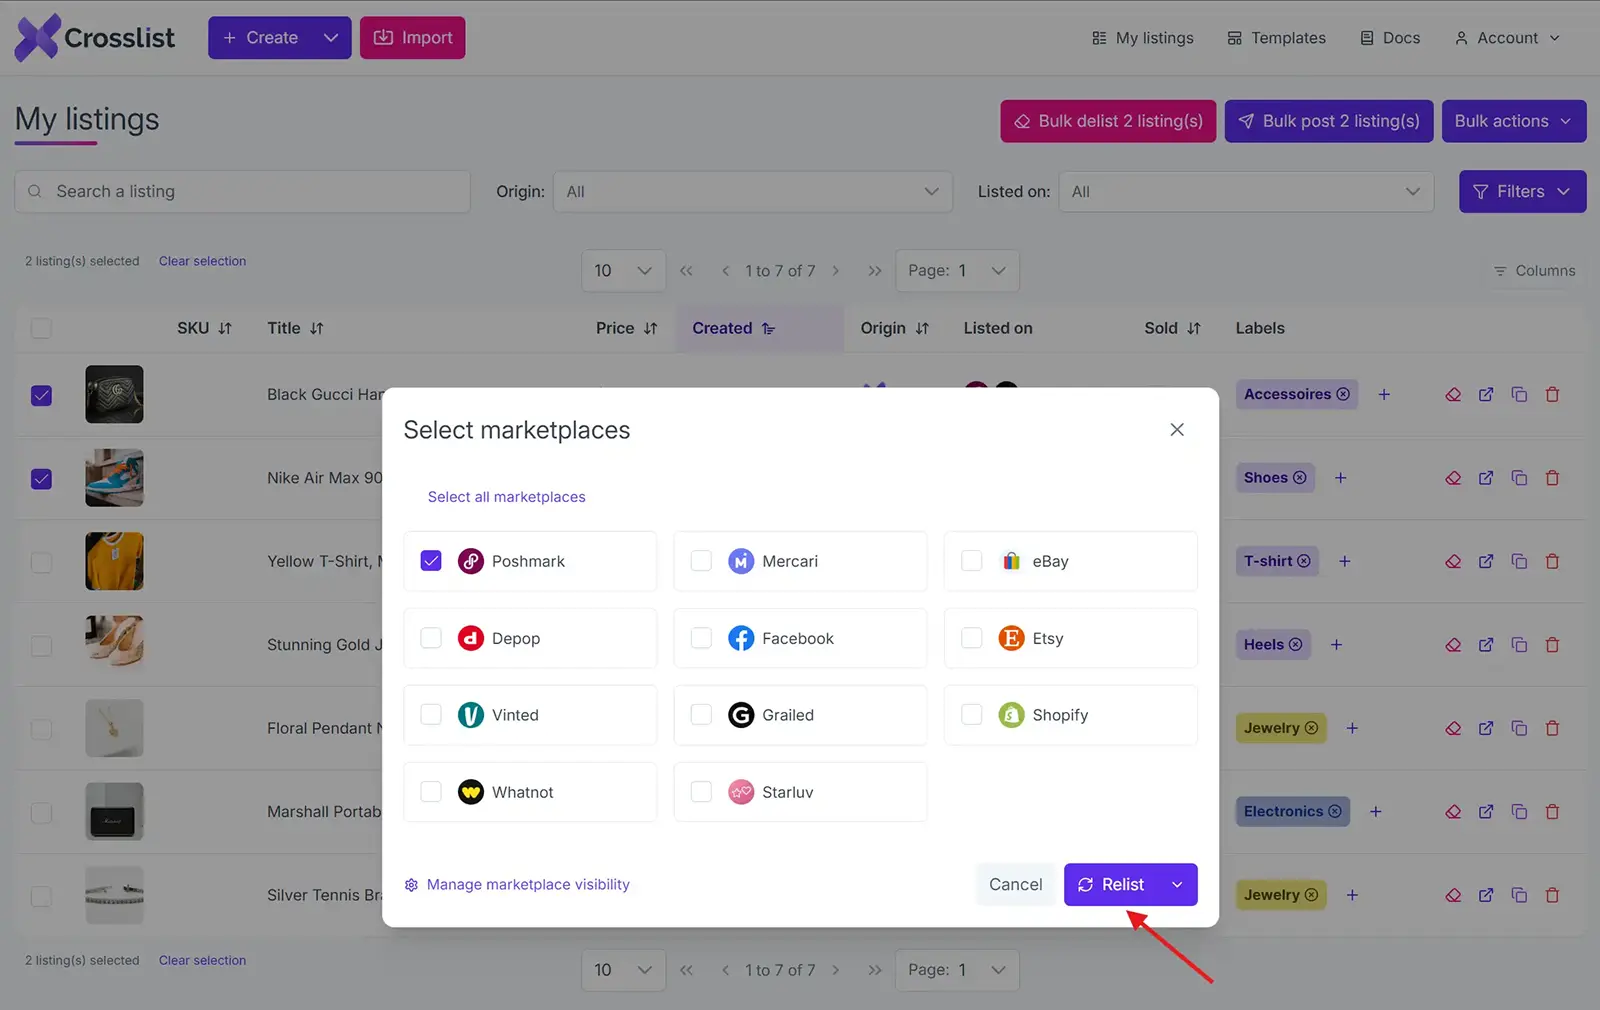
Once you’ve selected all the required listings, click on the Bulk post (x) listings button. You’ll find this at the top right corner of the screen.
You’ll see the pop-up with all the 11 marketplaces again. Select Vinted from the list.
Step 4: Click the “Relist” button
Now for the final step. On the same pop-up, you’ll see a button called Relist at the bottom. Click on that, and you’re good to go!
Crosslist will now automatically delete your existing Vinted listings and replace them with a newer copy. Any edits you made will be reflected on the relisted versions.
You don’t have to check and manually make your listings go live on Vinted, either. Crosslist automatically does that, so there’s no more intervention needed from your side.
Another thing to note is that Crosslist uses a queuing system to distribute your listings in periodic intervals.
This prevents Vinted from sounding the alarm bell on your account. Your device also won’t get bogged down, so you’ll be able to continue working on it.
Relisting a single listing on Vinted
The above method is great for relisting on Vinted — both in bulk and separately. But, if you only want to relist a single listing, there’s a more convenient way.
If the listing doesn’t already exist on Crosslist, import it by following step 1 from above.
Select the specific listing you want to relist from the listing overview. This will open the listing. You’ll be able to see all of the filled-in listing attributes as well as the list of supported marketplaces on the left side of the screen.
Make any edits you might want to by updating the listing attributes.
Select Vinted from the list of marketplaces.
Click on the Relist button at the bottom of the screen. That’s it! Your old listing will be swapped out for a newer version.
Vinted relisting tool: why Crosslist?
Crosslist is more than a Vinted relisting tool. It handles the repetitive work of relisting in bulk so you can focus on sourcing and selling, and it does a lot more once you're set up.
Fill out one dynamic form and post to every major marketplace at once. No separate form per platform, the way most cross listing apps still make you do it.
No laptop? No problem! You can relist, edit, and manage your inventory straight from your phone with the mobile app.
When an item sells on any connected marketplace, Crosslist detects the sale and removes the listing everywhere else with autodelist.
Don't feel like rewriting descriptions during a relist? Upload your photos and Crosslist generates complete listings with AI, including titles, descriptions, condition, and competitive pricing.
The AI photo editor cleans up images and removes backgrounds in bulk, with unlimited removals on every plan.
And because Crosslist supports the US, UK, Canada, and Australia, you can run you Vinted shop alongside the regional marketplaces most competitors can't reliably handle.
Here's what sellers say:
“This is a game changer. Keeps all inventory in one place, easy to delist and relist. Not just for huge resellers, it has saved me so much time and increased my sales. It pays for itself many times over.”
— Lorraine F., Trustpilot
Relisting is just one way to keep your Vinted sales moving. Try Crosslist risk-free with our 3-day money-back guarantee.
If your Vinted sales have started to slow down, it may be time to refresh some of your older listings.
And the best way to do this without spending a ton of money on marketing is by relisting your old listings that have gone stale and unnoticed.
Not only will relisting help your items get more visibility, it also opens the door for more sales.
Here’s an in-depth guide on the benefits of relisting, and how you can relist on Vinted with a cross listing tool like Crosslist.
Key takeaways
Relisting on Vinted replaces stale listings with fresh ones, boosting visibility in search results, the main feed, and follower notifications
Be careful: Vinted’s terms explicitly prohibit relisting the same item multiple times. Limit yourself to 2–3 relists per item per year to avoid account suspension
Good news: relisting on Vinted is completely free, no listing fees unlike Etsy ($0.20) or eBay ($0.35)
With Crosslist, you can bulk relist your entire Vinted inventory in minutes, which works for both UK and US Vinted sellers
Benefits of relisting on Vinted
Before we dive in, here’s a quick definition of relisting. Relisting is the process of deleting your old listing and replacing it with a fresher, identical (or updated) listing.
You’re essentially dusting off the cobwebs from your old and forgotten listings and placing a fresher version of them at the front to give them a boost in their visibility.
Here are the main benefits of relisting on Vinted:
Good for SEO: The Vinted algorithm prioritizes newer listings and shows them on the main feed. This helps the platform keep the inventory fresh and entices shoppers to check out Vinted every day. When you relist something, it’s considered to be a new listing, which means it’ll show up on the main feed and at the top of search results.
Enhanced visibility: Whenever someone filters by “newest listings first,” your relisted items will show up there. Any shoppers who have followed you on Vinted will also get a notification about the new listings.
More sales: More eyeballs on your listings translates to more sales.
After a while, as newer listings from other sellers pop up, people are going to stop seeing or interacting with your old listings. Relisting solves this problem.
In short, relisting on Vinted gives your stale listings a new lease on life.
When should you relist on Vinted?
When it comes to relisting on Vinted, moderation is key. You need to allow enough time to pass from when you originally posted the listing.
We generally recommend that you wait at least 60 days before you relist.
Apart from this, it’s a good idea to relist when:
Your old listings have gone stale, i.e. the items have remained unsold for months
The number of views and interactions with your listings have trickled down to zero
You have multiple variants of the same product, but a few variants haven’t sold even a single item
You want to make changes to your listings — either because you feel it could do with a boost, or because you’ve made minor changes to the products you’re selling
You’re selling seasonal items and want to give them a bump when the seasonal shoppers start coming in
Additionally, if a buyer returns your item after it was already sold, Vinted requires you to upload a new listing for it.
How often should you relist on Vinted?
You must be careful to not delist (i.e. delete) and relist the same item too often as that goes against Vinted’s terms and conditions.
If Vinted catches you doing so, your account may be suspended or permanently blocked.
Based on our experience, our recommendation for the frequency of relisting is to not relist the same product more than once per week.
Besides violating Vinted’s terms, it’s bad for your business as well.
Think about it this way. If shoppers open Vinted only to see you relisting the same products again and again, they’re going to lose interest.
Eventually, they will stop checking out your store, because they will assume that you have no new listings, as per usual.
Moreover, if you relist the same item two or more times and still don't get any interest, then your problem likely isn’t visibility.
It could be something to do with the product itself, or the listing might need a different Vinted selling approach.
To make sure that you don’t end up accidentally relisting the same products twice, have a tracking system where you can keep note of the ones that have been relisted.
Separate your items into batches or categories (i.e. clothes, shoes, etc.) and relist a single batch at a time.
Autodelist: what happens when an item sells?
One thing many relisting guides don’t talk about is what happens after an item sells on Vinted.
If you’re selling the same item across multiple marketplaces, a sale on one platform does not automatically remove it from the others.
Until you manually delist the item everywhere else, it can still be purchased by another buyer, without you noticing.
If it happens, you've double-sold. You’re forced to cancel an order, issue a refund, and potentially deal with negative feedback or marketplace penalties.
The more platforms you sell on, the easier it becomes to lose track of inventory manually.
This is why autodelist exists.
Cross listing tools like Crosslist can detect when an item sells on any connected marketplace and automatically remove the listing from every other platform.
That means less manual checking, fewer mistakes, and a much lower risk of double-selling.
Note: for some marketplaces, this requires your desktop app or browser extension to be running in the background.
These solve two different problems: relisting refreshes stale inventory to boost visibility, and autodelist protects sold inventory from double-selling.
If you're selling on more than one marketplace, you need both.
How to relist on Vinted in bulk (with Crosslist)
Normally, your relisting process would go something like this: you go to Vinted to locate the listing you want to relist, copy all the listing details on a notes app, delete the listing, create a fresh listing, copy all the details back up again, and post.
Vinted doesn't have a one-tap relist button, so this delete-and-repost routine is the only native way to do it.
It also helps to change something meaningful when you repost, like the cover photo or the title, so the algorithm treats it as a genuinely new listing rather than a duplicate.
While this process is fine for a single listing or two, it’s not really feasible for when you want to relist your items in bulk.
And, unless you only sell a handful of items, you probably will be relisting in bulk.
Relisting in bulk manually will eat up hours of your time and energy, and is prone to errors.
This is exactly where a product relister for Vinted like Crosslist earns its keep, turning that whole delete-and-repost routine into a couple of clicks.
Relisting manually | Relisting with a tool like Crosslist |
Very time-consuming; will take hours | Quick and easy; will be done in a few minutes |
Sucks up your energy and brainpower | Only needs the click of a few buttons, freeing up your energy to focus on more important things |
Prone to errors | Error-free |
One thing to know before you start: you have to delist your existing listings before you can relist them. Skip it, and Vinted may flag you for duplicate listings and remove your products.
Deleting each one by hand time-consuming part, but don't worry, because Crosslist automatically deletes a listing before replacing it with the new one.
Here's how relisting with Crosslist works.
Step 1: Import your existing Vinted inventory to Crosslist
Since the whole relisting process happens inside Crosslist, you need to have a subscription (naturally). So, if you aren’t already a Crosslist user, sign up here.
We have affordable monthly plans and offer a 3-day money-back guarantee (as long as you’ve created 20 or fewer listings).
The next order of business is to import your existing Vinted inventory to Crosslist. If your Vinted listings are already within the tool, you can skip ahead to step 2.
The rest of you: log in and head to your Crosslist dashboard. You’ll see an Import button at the top left corner of the screen.
Click on it, and you’ll see a pop-up (with a list of all the 11 marketplaces that Crosslist supports) open up on the screen.
Since we’re going to be bringing in your Vinted listings, select Vinted from the pop-up.
Crosslist will immediately start syncing your listings, preparing them to be imported. This is indicated by a yellow sync button.
This may take a few minutes, especially if you have a large inventory.
Once the sync process is over, your Vinted listings are ready to be imported to Crosslist. You can do this in one of two different ways:
Import your full Vinted inventory to Crosslist at once — regardless of how many listings you currently have
Import only specific listings (in batches of up to 100 listings each)
If you have a big inventory and are planning on relisting them all at some point, the first option would be your best option.
This way, you won’t have to keep repeating the process of importing your listings every time you want to relist.
Crosslist can also import your entire inventory at once (whether you have 25 listings or 250), so you don’t have any restrictions on the number of listings you can bring in.
It also helps to have your inventory in one place in case you want to cross list your listings to other marketplaces.
On the other hand, if there are a few items that you never plan on selling again, or if you only want to relist seasonal items, the second option might be easier.
For example, you only want to relist your Christmas-themed items, and don’t want to go through the hassle of searching for them from among your full inventory.
In this case, you can use Crosslist’s advanced search function to look up and select the listings you want to bring in.
If you're doing it in batches, you can toggle the Only show the listings not yet imported button to prevent yourself from accidentally importing the same listings twice.
After you’ve selected all the listings and are ready to import them, click on the Import button and wait for Crosslist to bring everything in.
Step 2: Navigate to the listing overview on Crosslist
The listing overview, also known as your dashboard, is where you’ll be able to see all of your listings at a glance.
(Note that you’ll only be able to see listings that were created in Crosslist, or were imported to Crosslist.)
Once Crosslist has brought all of your listings in, you can view them here.
Here’s what the dashboard will show you about your listings:
Title
Cover image
SKU (if one is available)
Creation date
Origin of the listing (whether it was created within Crosslist, or was imported from outside)
All the marketplaces the listing has been cross listed to
Listing labels (such as “shoes” for all listings of shoes)
To relist on Vinted, it’ll be easier if you could only view the listings that have been imported from (or) listed on Vinted.
If you just imported your Vinted listings through step 1, use the Origin tab to only show listings that were imported from Vinted.
If you were already a Crosslist user, you can filter the Listed on section to only show the listings that have been posted to Vinted.
💡 Want to update your listings with some fresh information or new product photos? Now is your chance.
Maybe you want to update your product prices, or add video listings to better highlight the benefits of your items.
Either way, click on the listing(s) you want to make edits to, and go ahead on making the changes!
Expert tips:
Whether you want to mark down the prices of your listings in bulk to get more sales, or want to mark them up to better reflect the current market, Crosslist lets you carry out this step in bulk. Go to Account Settings → Price Markup and enter a percentage or number on the field next to Vinted. This will make the price change across all of your listings. (Note: Enter a negative number or percentage to mark down your prices.)
If you want to make similar kinds of edits to several listings at once, you can use Crosslist’s templates. Create a template with the edit you want to make and apply the template to all of the relevant listings at once. Here’s a guide on editing listings in bulk with Crosslist.
Step 3: Select the listings you want to relist on Vinted
From your listing overview, select all the listings you want to renew.
If your plan is to relist your entire inventory at once, just select all by clicking the box at the top of the very first listing.
If you’re worried about relisting restrictions, you don’t have to be. Crosslist can delist and relist your entire inventory at once. In bulk.
Without making your Vinted account look like it was taken over by bots.
Once you’ve selected all the required listings, click on the Bulk post (x) listings button. You’ll find this at the top right corner of the screen.
You’ll see the pop-up with all the 11 marketplaces again. Select Vinted from the list.
Step 4: Click the “Relist” button
Now for the final step. On the same pop-up, you’ll see a button called Relist at the bottom. Click on that, and you’re good to go!
Crosslist will now automatically delete your existing Vinted listings and replace them with a newer copy. Any edits you made will be reflected on the relisted versions.
You don’t have to check and manually make your listings go live on Vinted, either. Crosslist automatically does that, so there’s no more intervention needed from your side.
Another thing to note is that Crosslist uses a queuing system to distribute your listings in periodic intervals.
This prevents Vinted from sounding the alarm bell on your account. Your device also won’t get bogged down, so you’ll be able to continue working on it.
Relisting a single listing on Vinted
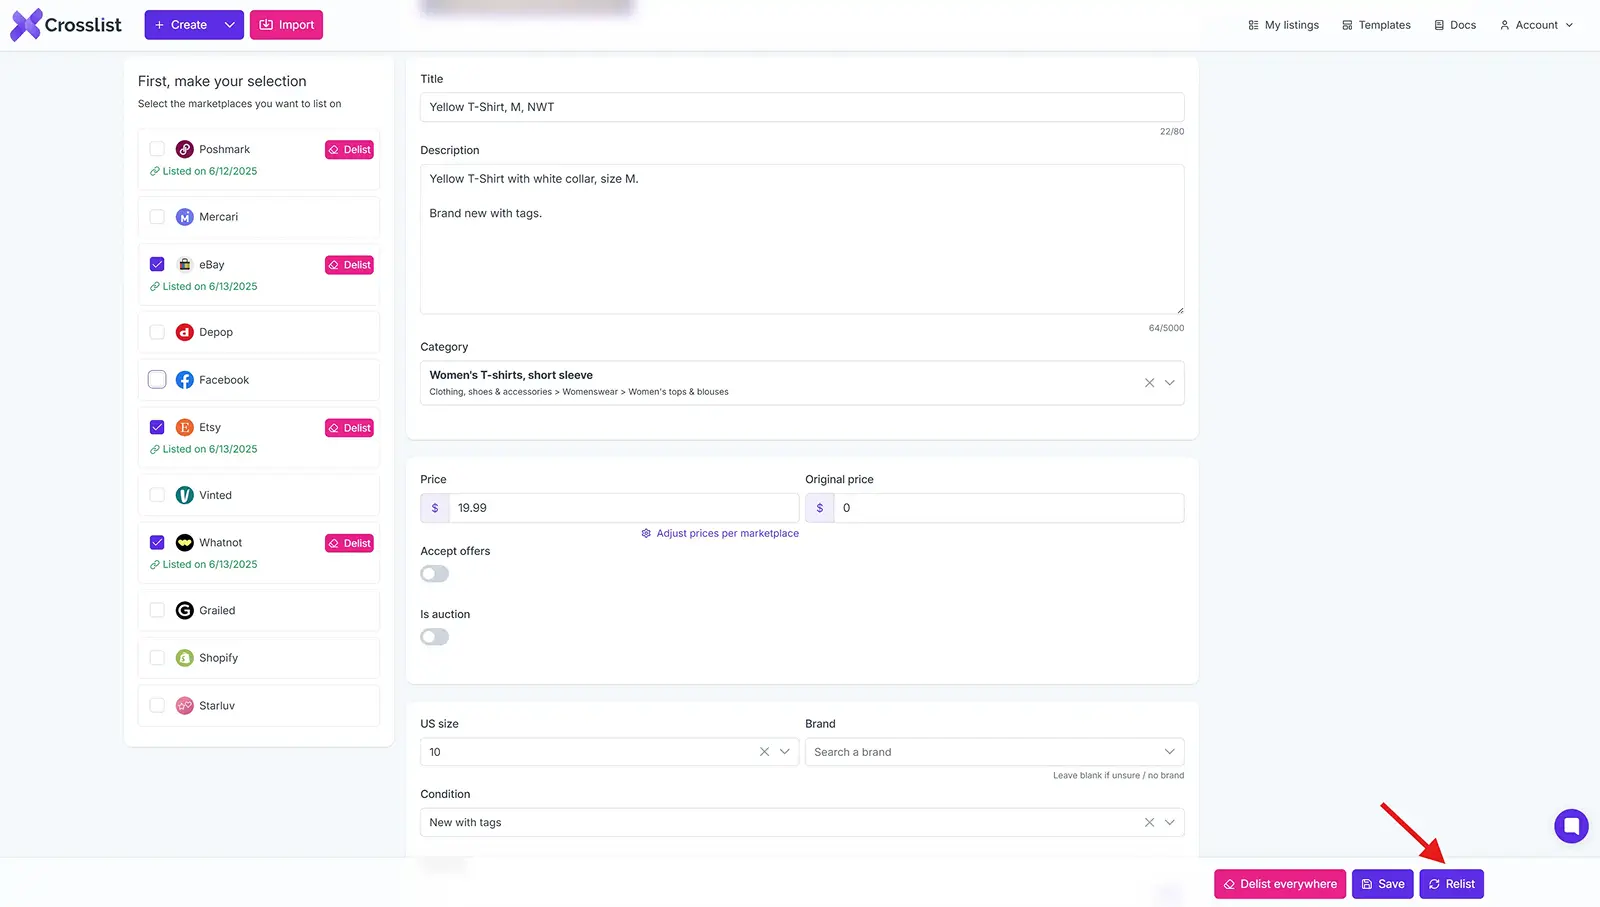
The above method is great for relisting on Vinted — both in bulk and separately. But, if you only want to relist a single listing, there’s a more convenient way.
If the listing doesn’t already exist on Crosslist, import it by following step 1 from above.
Select the specific listing you want to relist from the listing overview. This will open the listing. You’ll be able to see all of the filled-in listing attributes as well as the list of supported marketplaces on the left side of the screen.
Make any edits you might want to by updating the listing attributes.
Select Vinted from the list of marketplaces.
Click on the Relist button at the bottom of the screen. That’s it! Your old listing will be swapped out for a newer version.
Vinted relisting tool: why Crosslist?
Crosslist is more than a Vinted relisting tool. It handles the repetitive work of relisting in bulk so you can focus on sourcing and selling, and it does a lot more once you're set up.
Fill out one dynamic form and post to every major marketplace at once. No separate form per platform, the way most cross listing apps still make you do it.
No laptop? No problem! You can relist, edit, and manage your inventory straight from your phone with the mobile app.
When an item sells on any connected marketplace, Crosslist detects the sale and removes the listing everywhere else with autodelist.
Don't feel like rewriting descriptions during a relist? Upload your photos and Crosslist generates complete listings with AI, including titles, descriptions, condition, and competitive pricing.
The AI photo editor cleans up images and removes backgrounds in bulk, with unlimited removals on every plan.
And because Crosslist supports the US, UK, Canada, and Australia, you can run you Vinted shop alongside the regional marketplaces most competitors can't reliably handle.
Here's what sellers say:
“This is a game changer. Keeps all inventory in one place, easy to delist and relist. Not just for huge resellers, it has saved me so much time and increased my sales. It pays for itself many times over.”
— Lorraine F., Trustpilot
Relisting is just one way to keep your Vinted sales moving. Try Crosslist risk-free with our 3-day money-back guarantee.